Wednesday, July 31, 2019

Love From Lizi Happy Hauntings and Giveaway!

Hello!  Today, I'm sharing some fun Halloween cards using a few of the Love From Lizi Happy Hauntings Halloween Stamps.  These stamps are still available in the shop, but once they're gone, that's it.  I'm giving away one of these sets on my Instagram Account to celebrate 1000 followers.  Follow me here and enter to win: https://www.instagram.com/scrappychic17larisa


Thanks so much for stopping by!  Have a great day!!!

Card Details:

Tuesday, July 30, 2019

CC Designs Astronaut and Aliens

Hello!  It's Preview Day at CC Designs and I am so excited to share a very fun stamp set with you guys!  This is the NEW Astronaut and Aliens Clear Stamp Set as well as a NEW Outer Space Die Set which features the moon, planet, stars, rocket, etc.  How fun is that!  For my card, i used some outer space patterned paper, layered on my die cut moon across the bottom and added an orange planet.  Then I colored up my little astronaut and a couple of the aliens and cut them out using my Scan N Cut 2.  I popped them on top of my card using some foam tape.  To finish the card, I added my sentiment and some stars cut from glitter paper.  I just love how this turned out!  Such a fun set and that Outer Space Die set is an absolute MUST HAVE! 


Card Details:
Astronaut and Aliens Clear Stamp Set
Outer Space Die Set

Monday, July 29, 2019

La-La Land Crafts Background Stamps and Stencils

Hello!  This week at La-La Land Crafts, it's all about Background Stamps and Stencils!  To celebrate Christmas in July, I thought I'd make a fun little holiday card!  First, I started with a piece of teal card stock.  I used the It's Snowing Layering Stencil to sponge a blue snowflake background and then added some Nuvo Glitter Paste over the top.  Once it dried, I added two layers of snow and stamped my sentiment in the bottom right hand corner.  Then I colored up a couple of cute elves and popped them on top with some foam tape.  I added some trees and a few enamel dots and there you have it!  


Card Details:

Copic Colors:
Skin: E000, E00, E11, E04, R20
Red: R24, R27, R56, R59
Yellow: Y21, Y26
Green: YG21, YG25, YG67
Blue: BG10, BG13

CC Designs August & September

Hello!  Today, I have a fun little fall card to share with you.  This sweet little set is NEW from CC Designs: August & September Clear Stamp Set.  To create my card, I used some dies from my stash to create a sweet little autumn scene.  Then I colored up my little images, cut them out using the coordinating dies and popped them on top of my card using foam tape.  Then I layered them whole thing on top of some patterned paper.  


here's a look at the inside:


Card Details: 

Tuesday, July 23, 2019

La-La Land Crafts July 2019 Club Kit

Hello!  I'm back today sharing some fun cards featuring the NEW Club Kit from La-La Land Crafts!  You have until July 24, 2019 to subscribe if you want this exact kit!  Be sure to pop over the La-La Land Crafts website for all the details!  

For my first card, I decided to create a fun little superhero scene.  I used this cut little hamster image and popped him on top of some blue patterned paper and my die cut city skyline.  Then i die cut the coffee word die from the kit in white and adhered that across the top.  For the coffee bean, I created a fun signal effect using some yellow card stock and a circle die.  To finish my card off, I added my sentiment and some enamel dots.  


Card Details:
Coffee Hamsters Rubber Stamp Set
Coffee Word Die

Copic Colors:
Hamster: E30, E31, E34, E35, E37
Red: R24, R27, R56, R59
Blue: B24, B26, B229
Yellow: Y21, Y26

My next card features Coffee Marci.  I colored her up with my Copics and cut her out with my Scan N Cut 2.  Then I popped her on top of some fun patterned papers and added my sentiment to the bottom right corner.  Then I die cut several coffee cups in coordinating colors and stacked them together.  I added some whipped topping to the top one and finished it off with some Stickles glitter.  So fun!  


a look at the inside:


Card Details:
Coffee Marci Rubber Stamp
Coffee Cup Die
Coffee Pot Die

Copic Colors:
skin: E000, E00, E11, E04, R20
hair: C5, C7, C9
green: YG93, YG95
blue: B24, B26, B29
teal: BG13, BG57
yellow: Y21, Y26
orange: YR04, YR16, YR18


Monday, July 22, 2019

La-La Land Crafts Create A Tag!

Hello!  Hope you are having a fabulous Monday!  This week's theme at La-La Land Crafts is Create A Tag!  So I did just that.  I used the NEW This Little Piggy Stamp Set to create a sweet little tag.  
To start, I cut my tag from some heavy weight white card stock and stamped a gingham pattern in yellow.  Then I layered on some patterned paper strips, a die cut lattice, and a green die cut vine.  Then I added my little pig with some foam tape, stamped my sentiment, and embellished the top of the tag with a circle die.  Then I added some little red hearts and some red ribbon to finish it off.  


Card Details:
Simple Joys Background Stamp Set: https://www.lalalandcrafts.com/Simple-Joys_p_1083.html

Copic Colors: 
Pigs: R000, R11, R20, E99
Green: YG21, YG25, YG67
Yellow: Y21, Y26
Orange: YR15, YR18

Saturday, July 20, 2019

Love From Lizi Summer Fruits Kit

Hello!  I'm so excited to share the cards I made with the July Love From Lizi Card Kit!  Unfortunately, this kit is sold out.  However, two of the add-on stamp sets are still available and I have linked them below.  So check those out if you're interested.  


For my first card, I used this cute little girl stamp with her back turned and paired her with a Greeting Farm Stamp Set in my stash.  I used some cream card stock to create my sand background and added some texture with some distress inks and Copic Markers.  Then I added a die cut umbrella and blue card stock for water.  I mounted the whole thing on patterned paper using fun foam and finished it off with my stamped sentiment and some sequins from the kit.  


Card Details:

For my next card, I used several of the patterned papers and paired them with some more neutral patterned from my stash.  I layered them up all together and added my little girl with foam tape.  I also used some gold glitter washi from the kit as well as the purple enamel dots.  


For this card, I created a fun beach scene using a few layers of card stock and distress inks.  This card features this cute little girl from the Summer Loving Add- On Stamp as well as several die cuts I've listed below.  I just love how this turned out!  


Card Details:

My next card is clean and simple.  I started with a piece of white cardstock, added some strips of patterned papers, some glitter washi, and stamped my sentiment to the top right corner.  Then I colored up my image, cut it out with my Scan N Cut 2 and popped it on top of the papers with foam tape.  To finish it off, I added a few enamel dots from the kit and there you go!  


Card Details:

This card was created almost entirely with Copic Markers.  I used markers to create my beach scene, colored up my images and popped them on top using some foam tape.  Then I added some die cut clouds to sky and stamped out my sentiment.   


Card Details:

This last card was a ton of fun to create!  First I sponged a cloud background using a cloud stencil from MFT and some distress inks.  Then I used a few dies from my stash to create a fun beach scene complete with tiki bar.  I stamped out my image, colored her up with Copic markers, and cut her out with the dies that came in the kit.  Then I popped her on top of my card using foam tape and added a few cloud stickers from Jolee's Boutique.  


Card Details:

Thanks so much for stopping by!  Have a great day!  

Thursday, July 18, 2019

CC Designs Oscar

Hello!  Today, I'm sharing a fun and very bright card using the New Oscar stamp from CC Designs.  Isn't he just the cutest?  For my card, I first created a scene using the NEW Create A Scene Clear Stamp Set.  The set is so awesome and allows you to create a different scene with every card!  I stamped out Oscar, then covered him with masking paper, and stamped my trees, shrubs, and flowers.  Then I colored the whole piece using Copic markers.  To create my card, I mounted my scene on a die cut scalloped rectangle, added it to some brightly colored patterned paper, and added a couple of red banners from the NEW Large Banners Die Set.  


here's a look at the inside: 


Card Details:

Monday, July 15, 2019

La-La Land Crafts Interactive Card

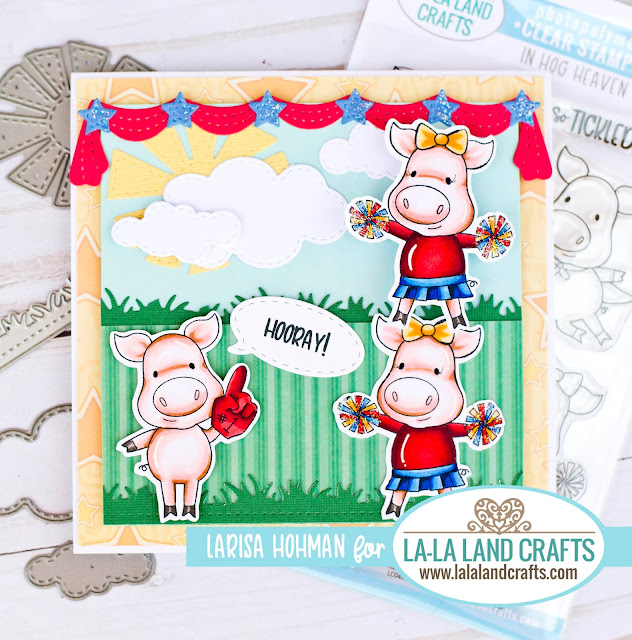
Hello!  This week, I'm excited to share a fun interactive card using an action wobble!  To create my card, I started with some light blue card stock and cut it into a square.  Then layered on some green striped patterned paper, some die cut grass, and a few clouds and sun.  Then I stamped out my little piggies, cut them out with my Scan N Cut 2 and adhered them on to my card.  The top cheerleading piggy is mounted onto an action wobble so when you touch her, she wobbles back and forth.  Then I just mounted the whole panel onto some yellow star patterned paper, added a red banner across the top and finished it off with my sentiment and some glitter stars.  


Here's a look at the inside: 


Card Details:

Copic Colors: 
Pigs: R000, R11, R20, E99
Red: R24, R27, R56, R59
Blue: B24, B29, C7
Yellow: Y21, Y26


Club La-La Land Crafts July 2019 Club Kit Reveal

Hello!  It's time for the New Club La-La Land July Kit Reveal!  This month's theme is all about coffee!!!  The kit features Coffee Marci, Coffee Hamsters, a coffee word die, coffee cups die, and a coffee pot die!  How awesome is that!  You have until July 24th to sign up and all the details can be found HERE! 

For my first card, I started with some yellow plaid patterned paper and trimmed it to a rectangle to fit my card.  Then I layered on a piece of navy blue card stock stamped with the NEW Simple Joys Background Stamp.  Then I tucked in a die cut circle cut from floral paper behind it.  I colored up my Marci image using Copics and trimmed her out using my Scan N Cut 2.  Then I created a little tag featuring the coffee pot and adhered both of them to my navy blue square.  I added a pink scallop to the bottom of my card and layered on my coffee sentiment across the bottom.  To create it I first cut the words out of white card stock and then again out of fun foam.  I adhered the two together and glued the whole thing on my card for some fun dimension.  A few enamel dots finish it off.  


here'a a look at the inside:


Card Details:
Simple Joys Background Stamp Set: https://www.lalalandcrafts.com/Simple-Joys_p_1083.html

Copic Colors:
Skin: E000, E00, E11, E04, R20
Hair: E43, E47, E49
Yellow: Y21, Y26,
Red: R24, R27, R56, R59
Teal: BG10, BG11, BG13
Grey: W3, W5, W7
Dark Teal: BG09

For my next card, I used two of the cute little hamsters.  First, I started with a yellow piece of patterned paper and trimmed into into a rectangle to fit my card.  I layered that on top of a piece of kraft paper and trimmed that into a rectangle as well.  Then i die cut a strip of wood grain pattered paper and adhered that to a piece of black card stock that was slightly larger.  I glued both to the center of my yellow panel.  Then I die cut two squares from a striped patterned paper and mounted those on blue card stock.  I colored up my two hamsters using Copic markers and cut them out using my Scan N Cut 2.  Then I popped each of them on top of the die cut squares.  I adhered both of those onto my wood grain paper and added my coffee sentiment to the top of my card.  Then I added my sentiments below each hamster and finished the card off with some die cut stars and enamel dots.  


here's a look at the inside:


Card Details:

Copic Colors:
Hamsters: E30, E34, E35, E37, R00
Yellow: Y21, Y26
Blue: B24, B26, B29

Thursday, July 11, 2019

CC Designs July Release!

Hello!  It's Release Day at CC Designs!  So many fun products being released this month including Ink! I used the new Sugar Cookie Ink to try No Line Coloring for the first time.  I certainly took a little practice, but I just love how this Lumberjack turned out!  For my card, I decided to create a fun little woodland scene.  I used the Evergreen Background Stamp and Lumberjack Dies to create it.  Then I stamped out my image, colored it up and cut it out with my Scan N Cut 2.  I popped it on top of my scene using some foam tape and added a little page flag to the corner.  For the background panel, I used some birch tree patterned paper and the Plaid Background Rubber Stamp to give the card a masculine feel.  


here's a look at the inside:


Thank you so much for stopping by!  Be sure to head over to the CC Designs Shop to check out all the new goodies!  

Card Details:
Lumber Jack Clear Stamp Set
Evergreen Background Rubber Stamp Set
Plaid Background Rubber Stamp Set
Lumber Jack Dies
Sugar Cookie Ink


Monday, July 8, 2019

CC Designs July Release Preview Day #1


Hello!  It's Day #1 of the July Peeks for the NEW CC Designs Release!  Today, I'm featuring the new stamp set August & September as well as a new alphabet die set!  For my card, I used the school themed stamps from the stamp set to create this fun little Back To School Card!  I thought this would be perfect for a special teacher or student.  To create my card, I used some patterned paper in the background and layered it together.  Then I used a die from my stash to create a cute little pencil and added my large ABC to the bottom of the card.  Then I colored up my little images, cut them out with the coordinating dies and popped them on my card using some foam tape.  I just love how this turned out and how the large alpha die create a fun focal point of my card!  


here's a look at the inside:


Thank you so much for stopping by!  Be sure to visit the CC Designs Blog to see all the other Desgin Team creations!  

Card Details:
August & September Clear Stamp Set
August & September Coordinating Dies
Olive You Alphabet & Number Die Set


La-La Land Crafts - Day at the Beach

Hello!  This week's theme at La-La Land Crafts is Day at the Beach!  For my card, I decided to get a jump on my holiday cards and create a fun Santa card.  He's surfing at the beach, enjoying a holiday of his own! For my card, I used several dies to create my beach scene.  I layered them all on top of some cloud patterned paper and added Santa in the waves.  Then I used the top of the Castle Border die to create a little sand castle on the shore and added my sentiment on the bottom right hand corner.  I just love how this turned out.  So fun and festive!  


here's a look at he inside:


Card Details:

Copic Colors: 
Skin Colors: E000, E00, E11, E04, R20
Beard: W1, W3, W5
Red: R24, R27, R56, R59
Green: YG21, YG25, YG67
White: C1, C3

Sunday, July 7, 2019

Love From Lizi Happy Haunting!

Hello!  Today, I'm sharing some coloring and a card I made using the Happy Haunting Stamp sets from Love From Lizi.  These sets were originally released last September, but sold out very quickly.  Luckily, she has brought them back in the store and they are currently available for purchase in her shop.  I did manage to get my hands on them when they were released last year, but I didn't have a chance to color or create with them. So I vowed to make some time this summer!  There are 3 total stamp sets available and I've linked each of them below in case you are interested!  

First, I stamped out all these cute images and colored them up with my Copics.  Then I added some fun glitter effects with my Sakura Stardust Glitter Pen.  I just love how these turned out!  So fun!  I haven't created cards with all of them just yet, but I did manage to create one that I will be giving away on my Instagram Page along with some other special goodies!  If you don't currently follow me on Instagram, be sure to pop over there and follow me soon.  I'll be posing my give away in a week or two.  


For my card, I stamped out my image, colored her up with Copics, and added my glitter accents.  Then I die cut her out and set her aside.  I used the Echo Park Bewitched Collection and trimmed a piece of purple bat paper to fit my card base.  Then I layered on a strip of black and white stripe, and separated the two with a thin strip of glitter card stock from MFT.  Then I die cut the spiderweb doily die from black card stock and layered a piece of patterned paper cut into a circle on top.  I added my girl image with some foam tape and added my sentiment with foam tape as well.  To finish it off, I used 3 bat stickers from Hobby Lobby.  


Here's a look at the inside: 


Thank you so much for stopping by!  Have a great day!!!

Card Details:


Saturday, July 6, 2019

Avery Elle Peek-a-Boo Scary Pals

Hello!  I'm so excited to share this very fun and very whimsical card using the NEW Peek-A-Boo Scary Pals from Avery Elle!  For my card, I used some patterned paper and layered it together for my background panel.  Then I used a retired polaroid frame die from My Favorite Things to cute a white photo frame.  I mounted that on fun foam to give it some dimension and built my scene within the opening.  I used various dies to create this city-scape and then added my monsters and car in front of that with some foam tape.  I added my sentiment to the bottom right hand corner and finished the card with some balloons in various colors.  


here's a look at the inside:


Card Details:
Avery Elle Peek-A-Boo Scary Pals Clear Stamp: https://www.averyelle.com/peek-a-boo-scary-pals-clear-stamps/
Avery Elle Peek-A-Boo Car Clear Stamp: https://www.averyelle.com/peek-a-boo-car-clear-stamps/
Avery Elle Peek Car Elle-ments Die: https://www.averyelle.com/die-peek-a-boo-car-elle-ments/
Taylored Expressions Starry Night Cutting Plate: https://www.tayloredexpressions.com/dies/starry-night-cutting-plate.html


Monday, July 1, 2019

La-La Land Crafts- On the Farm!

Hello!  This week's theme at La-La Land Crafts is On The Farm!  So I created a fun little farm scene for my card.  To create my card, I started with some cloud patterned paper and trimmed it into a square for my background.  Then I layered on some green die cut hills and added a little barn die cut from the house die.  Then I used the tree from the Halloween House Add-On and layered a circle behind it.  I colored up a couple of cute chickens and a little pig, cut them with my Scan N Cut 2 and popped them at the bottom of the card along with a white fence, some flowers, and vines.  I just love how this turned out. So fun!  


Inside view: 


Card Details:

Copic Colors:
Chicks: Y21, Y26, Y35
Red: R27, R56, R59
White: E50, E53
Orange: YR15, YR28
Pig: R000, R11, R20, E99