Wednesday, January 27, 2021

Picket Fence Studios Slimline Cards

Hello!  Today, I'm sharing a couple of slimline cards using some of the new goodies from the January Release of Picket Fence Studios!  Slimline cards are all the rage right now and Picket Fence Studios has you covered!  So many stencils, dies, and even envelopes!  It's your on-stop-shop for all your slimline needs!!!  

For my first card, I used the NEW Slimline Ocean Waves Cover plate.  However, instead of creating waves with it, I die cut it from glitter white card stock and made snow!  I love that it's so versatile!  I layered my glitter panel on top of some white card stock cut with the Slimline Die Cutting System and added some die cut snowflakes throughout the scene.  For my gnomes, I stamped them out, trimmed them apart, colored them with my Copics, and tucked them into the hills of my snow banks.  Then I added some of the NEW Spring Fling Sequins and Purple Side of a Rainbow Gems to give it some sparkle.  I stamped my sentiment from the More Fancy Sentiments Stamp Set and die cut it out with the coordinating dies (this is one of my favorite sets, by the way!  Love it!).  Then I popped it on top of my card with some foam tape for added dimension.  


For my next card, I created a vertical slimline card.  To begin, I die cut a piece of white card stock using the Slimline Die Cutting System.  I die cut a smaller rectangle from white card stock as well and used the NEW The Sleeping Tree Stamp Set to stamp my tree in the center.  Then I used some distress inks and the NEW 52 Layers of Clouds Stencil to create my background, careful not to cover the center of my tree image.  I colored that in with Copics.  Then I die cut some Tall Grass and adhered that to the bottom of the image.  I added some of the NEW Fire Gem Mix to my image, matching the colors with the distress inks in the clouds.  Then I stamped my sentiment from the Fancy Christmas Sentiments Stamp Set.  I used the coordinating dies to cut it out and added it to the bottom of my scene.   


 Products Used:


The Greeting Farm Be Mine Valentine Shaker

Hello, I'm so excited to be sharing a fun Greeting Farm Valentine's Day card with you!  I just love stretching my stamp sets and using them for different holidays!  Today, I'm using an image from the Miss Anya Samoyed Clear Stamp set to create a sweet little Valentine Shaker!  

To create my card, I started with some patterned paper.  I trimmed it to fit the front of my card base and layered my embellishments on top.  I die cut a decorative frame and popped it up on foam to create a sweet little shaker.  Then I added a die cut bow to the top of that in coordinating paper.  I stamped out my Anya image, colored her up with my Copics, and fussy cut her out.  Then I popped her on top of the shaker with a coordinating floral sticker tucked in behind her.  I found the perfect sentiment from an older Greeting Farm Set and added that to the top of the flowers.  A few die cut hearts finish off this Valentine!  

Here's a closer look:


Thank you so much for stopping by today.  I can't wait to see how you stretch your stash!  

Monday, January 18, 2021

CC Designs Lovey Critters

Hello!  Today, I'm sharing a sweet little card using the NEW Lovey Critters Clear Stamp Set from CC Designs.  To create my card, I started with some patterned paper and layered it together for my background panel.  Then I created a little scene in the center of the card using a cloud stencil and some distress oxide ink.  I layered on some die cut grass, a little dog house and a page flag in the top right-hand corner  Then I colored up my image, cut it out with the coordinating dies, and popped it on top using some foam tape.  A sweet little sentiment across the bottom finishes it off.  Too cute!  


Card Details:


Thursday, January 14, 2021

The Greeting Farm January 2021 Release and Blog Hop!

The JANUARY 2021 RELEASE is now available for purchase in The Greeting Farm Store! First up, we introduced you to MISS ANYA FANNY PACK with 3 different big Anyas carrying fashionable critter fanny packs. Next, we have CAFFEINE CRITTERS... a set featuring 5 coffee loving critters. Our 3rd set called DREAMS DO COME TRUE has Anya and Ian living happily ever after in their castle with a pet frog and unicorn! And finally, we have a brand new stand alone MAGIC CASTLE DIE.

Today, I'm featuring Miss Anya Fanny Pack.  This little cutie is just too cute.  For my card, I created a tag pocket.  I used a premade card base and cut the top half  of the front cover off.  Then I stitched it closed with my sewing machine, leaving the top open so that it forms a pocket.  Then I used some patterned papers in my stash to create a tag to insert into the pocket.  I decorated the front of my pocket with some die cuts and ephemera that matched the set.  Then I stamped out my image, colored her up with Copics, and fussy cut her out.  I popped her on top of my card using foam tape and added a few gold glitter stars to finish the project off.  


Here's a closer look:


Coloring Details:

Skin: E000, E00, E11, E04, R20

Hair: E43, E47, E49

Orange: YR04, YR18, E08

Green: YG67

Yellow: Y21, Y26, E87

Tan: E35, E37

To celebrate this release we are having a short BLOG HOP! One lucky fan will take home all 3 clear stamps sets! You have until January 18th, 12pm CST/1pm EST to leave your comments on each Designer's Blog and The Greeting Farm Blog (letting us know you completed the hop). Please only leave 1 comment. We will announce the random winner later in the week on the Blog and in our Facebook Group: The Greeting Farm Fan Page.


NOTE: Please use the same name on all the blogs when leaving a comment, and do not pick the Anonymous option when leaving a comment (otherwise we won't be able to verify that it's you). Thank You!

This is a short hop and definitely worth playing along! If you want to grab your faves now, you can purchase the new stamps HERE. We will have more cards featuring the New Release from our Design Team Leaders starting on the 18th so be sure to stop by The Greeting Farm Blog to see more inspiration.

Happy Hopping!

Picket Fence Studios Release Day!!!

 Hello!  It's release day at Picket Fence Studios!!!  This month is PACKED full of new goodies.  Seriously, this release is enormous!!!!  You are going to love it!!!  

For my first card, I used the Slimline Die Cutting System to cut my card base.  Then I used the smaller rectangle to cut a piece of orange card stock.  I added some of the NEW Yellow Primrose Paper Glaze to the NEW Coloring Book Stencil and set that aside to dry.  Then, I stamped out the NEW Wild Peonies Clear Stamp on some Copic-friendly card stock and colored it up with my markers.  After fussy cutting it out, I adhered it to my card panel with foam tape and a bit of messy gold thread tucked behind it.  Then I stamped out the "thinking of you" sentiment from the NEW More Fancy Sentiments Stamp Set and cut it out with the coordinating dies (I absolutely LOVE this set and will be using it all the time!).  Then I adhered that to the middle of my flower image.  For a finishing touch, I added some Irish Coffee Sequins.  


My next card features the NEW Ride With Me Dear Clear Stamp set and Coordinating die.  To create this card, I started with a piece of black card stock and heat embossed the NEW Aurora Borealis Stamp with gold embossing powder.  Then I used some dies in my stash to create some snowy slopes and mountain range.  I stamped my sentiments in the bottom right-hand corner of the card and heat-embossed the "birthday boy" sentiment with clear embossing powder on top of purple ink.  Then I stamped out my image, colored it up with Copics, and cut it out with the coordinating die.  I added a lot of Stickles glitter to the dragon's wings and popped the image on my card using foam tape.  


For my final project, I decided to create a stitched re-usable envelope.  First, I used my envelope punch board to create my envelope out of patterned paper.  Then, I stitched around the edges and added some hook-and-loop tape to the closure.  Then I started working on my front panel.  This gorgeous NEW stamp is called Life Happens, Lashes Help!  This stamp set is a MUST!!!  I stamped the main image out in black.  Then I added my sentiment just under the eyes and stamped that in red ink.  I heat embossed the sentiment with clear embossing powder.  Then I trimmed the piece into a rectangle and layered it on top of some black card stock.  I stitched around that with my sewing machine and added a ruffled piece of red fabric and gold washi tape to the top left corner.  Then I tucked a gold doily behind the image and adhered it to the front of the envelope.  For the dangle on the side, I punched a whole, added an eyelet and a couple of dangles.  So much fun!


Wednesday, January 13, 2021

The Greeting Farm January 2021 Release Preview Day #4


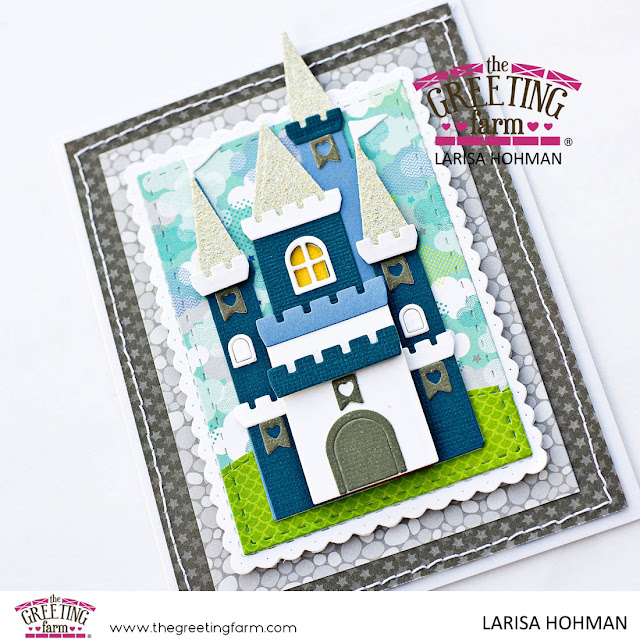
I'm back with one more day of previews!  Today, we're featuring the NEW Castle Die!  This die creates the cutest little 3D castle, perfect for all sorts of projects!  

For my card, I started with some fun patterned paper from Doodlebug.  I layered it up, stitched around the edge with my sewing machine and adhered it to the top of my card base.  Then I die cut and assembled my die.  I used foam tape on some portions, giving it dimension and interest.  Once my castle was put together, I popped it onto my little scene.  Such a simple card that really makes an impact!  


Card Details:
The Greeting Farm Castle Die
Patterned Paper: Doodlebug

Thanks so much for stopping by!  Come back tomorrow for the blog hop and release celebration!