Monday, January 27, 2020

La-La Land Crafts: Birthday

Hello there!  Hope you are having a great week!  Today, I am sharing a festive birthday card using stamps and dies from La-La Land Crafts!  This week's theme is all about birthdays!  
For my card, I decided to use this adorable little balloon penguin, dressing him up in a few accessories from other sets!  I just love that so many of the clear sets coordinate together!  I layered up some bright patterned paper, die cut a white scalloped rectangle and popped that on top with some foam tape.  Then I layered some pink paper inside of that and added a scalloped oval on top.  I colored up my little penguin and added him to the center using foam tape.  Then I embellished with some ribbon, enamel dots, glitter washi, and my sentiment.  A cute little die cut present finishes it all off.  


Card Details:

Copic Colors:
Penguin: C1, C3, C5, C7, YR04, YR27, E08
Blue: B24, B26, B29
Yellow: Y21, Y26
Red: R22, R24
Teal: BG10, BG11, BG13

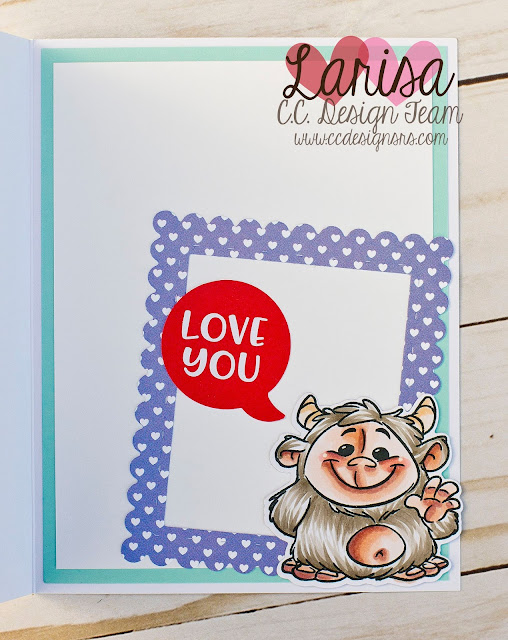
CC Designs Abominable Valentine

Hello!  Valentine's Day is just around the corner and I have the  cutest Valentine card to share with you using the NEW Abominable Clear Stamp Set from CC Designs!  To create my card, I started with some patterned papers.  Then I die cut a white In & Out Rectangle frame.  I layered on a scalloped hear and popped my little yeti on top using some foam tape.  I added a few die cut hearts, some enamel dots, and there you have it.  One abominable valentine!  


here's a look at the inside:


Card Details: 


Saturday, January 25, 2020

CC Designs Tiny Canadians

Hello!  I'm back today to share a fun little card using the NEW Tiny Canadians Clear Stamp Set from CC Designs!  This set is absolutely adorable and a MUST for your stash!  For my card, I used some of the NEW In The Forest Patterned Papers.  I layered them up in the background and then added a white die cut tag on top.  Then I colored up my image and cut him out using the coordinating dies.  I popped him on top using some foam tape, added some enamel dots, a page flag, some ribbon, and a cute button.  I just love how this turned out.  So much fun!  


here's a look at the inside:


Card Details:


Tuesday, January 21, 2020

Club La-La Land Crafts January Kit

Hello!  I'm back with a couple more cards using the NEW Club La-La Land Crafts January Kit!  


For my first card, I used Marci with Pen.  I colored her up in some fun "Valentine Colors" and fussy cut her out.  Then I popped her on top of a die cut circle and layered that on top of some cut typewriter paper.  I cut a strip of hot pink paper and layered that on top of some white card stock.  Then I added that to the right side of my card and layered on the envelopes border.  I also die cut the "with love" sentiment from some grey and red card stock and layered them both together.  I popped that on the bottom of my card, just under Marci's feet.  A few enamel dots finish it all off.  


Card Details:
Marci with Pen Rubber Stamp
Envelopes Border Die
"With Love" Sentiment Die

Copic Colors:
Skin: E000, E00, E11, E04, R20
Hair: C5, C7
Teal: BG10, BG11, BG13
Light Pink: RV000, RV10
Pink: RV10, RV13
Red: R24, E27, R56
Grey: C1, C3

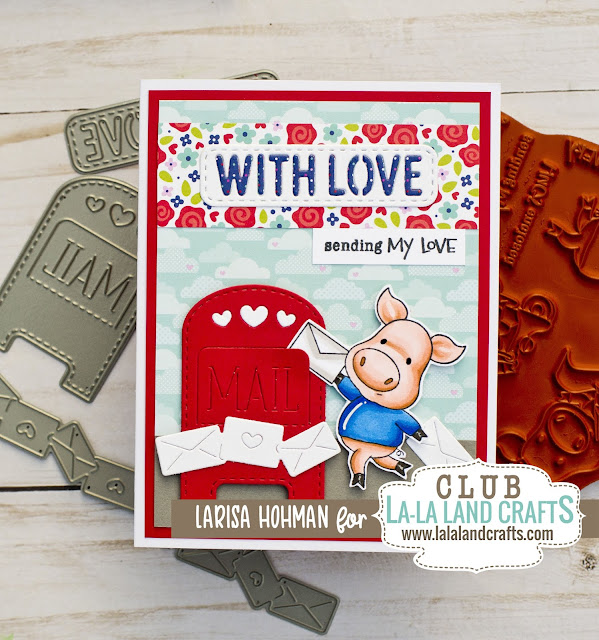
For my next card, I used one of the adorable pigs from the Happy Mail Rubber Stamp Set.  First I layered some sky patterned paper onto some red card stock and trimmed it to fit my card base.  Then I cut a strop of rose patterned paper and added that to the top of my card.  I die cut the "with love" sentiment die and popped that on top with some foam tape.  I also added a little sentiment just below it cut into a rectangle.  For the bottom of my card, I added a strip of grey card stock and popped my red mailbox on top to the left of my card.  I used the Envelopes Border die and trimmed a few of the envelopes from the strip, adding them to the bottom of my mailbox.  I colored up my little pig with Copics, fussy cut him out, and popped him to the right of the mailbox.  Then I added another envelope from the border die to his left hand.  


Card Details:
Happy Mail Rubber Stamp Set
Mail Box Die
Envelopes Border Die
"With Love" Sentiment Die

Copic Colors:
Pig: E93, E95, E97
Blue: B24, B26, B29
Black: W5, W7
Grey: W1, W3

CC Designs Gift Card/Treat Envelope Tutorial

Hello!  I am so excited to share a fun tutorial using the NEW CC Designs Patterned Paper!  With just a single sheet of 6X6 paper, you can create a cute little gift card/treat holder envelope! 

Step #1: Start with a 6X6 sheet of patterned paper. 


Step#2: Fold the paper in half to create a triangle shape. 


Step #3: take the top of the triangle and fold one side down just a ¼ of an inch from the bottom.  Use your bone folder to smooth the fold. 


Step #4: Under the fold, take the right side of the triangle and fold underneath the top fold as seen in the photo below. 


Step#5: Do the same to the left hand side. Make sure that the top fold can still lay on top of your folds. 


Step #6: Fold the top down and staple it to the front.  You should have a pocket now.  Do not staple the back of your envelope. 


Step #7: Use a punch to round the corner on the top.  The bottom will not matter, we are going to cover it up. 


Step #8: Decorate the front of your envelope and stuff it with goodies like gift cards or candy. 


Monday, January 20, 2020

La-La Land Crafts Blue and Gold


Hello!  This week's theme at La-La Land Crafts is Blue and Gold.  For my card, I decided to create a fun winter scene using the new patterned papers and Snow Amazing Stamp set!  To begin, I started with a sheet of the blue and white snowflake paper from the Blue Christmas Paper Pack.  I trimmed that to fit the front of my card panel.  Then I added a small strip of blue and white checkered paper to the bottom as well as a die cut scalloped strip of gold foil card stock.  Then I die cut a snowy hill for my bunnies and added that just above the checkered paper.  I used the Three Christmas Trees die to cut some gold trees and then I cut them apart to create two individual trees for the background.  Then, I colored up my bunnies and fussy cut them out.  I added them to my scene using foam tape and added a few gold sequins to the background.  


Card Details:
Snow Amazing Clear Stamp Set: https://www.lalalandcrafts.com/Snow-Amazing-Clear-Stamp-Set_p_1111.html
Blue Christmas Paper Pack: https://www.lalalandcrafts.com/Blue-Christmas-Paper-Pack_p_1113.html
Double Stitched Hills Border Die: https://www.lalalandcrafts.com/Double-Stitched-Hills-Border-Die_p_704.html
Stitched Scallops Border Die: https://www.lalalandcrafts.com/Stitched-Scallops-Border-Die_p_748.html
Three Christmas Trees Die: https://www.lalalandcrafts.com/Three-Christmas-Trees-Die_p_751.html

Copic Colors:
Bunnies: E50, E53, R20
Blue: B24, B26, B29
White: C1, C3
Brown: E35, E37, E49


Wednesday, January 15, 2020

La-La Land Crafts January Club Kit Reveal!

Hello!  Today, I'm so excited to share the new January 2020 Club La-La Land Crafts Kit!  This month is all about love!  So many fabulous dies and some adorable stamps to coordinate!  How fun!  Just a reminder that if you want this exact kit, be sure to subscribe by January 20, 2020!  You can find all the details HERE on the La-La Land Crafts Website!  


For my first card, I used Marci with Pen and colored her up with my Copics.  Then I fussy cut her out and set her aside while I worked on my card base.  I used some patterned paper and trimmed it to fit the front of my card.  Then I die cut a red scalloped rectangle and layered some word paper on top.  I popped that on top of my card panel using some foam tape.  Then I centered Marci on top and added some foam tape to her as well.  I die cut the Ink with Pen from coordinating papers/card stock and layered them next to her on the card.  Then I added the envelopes border to the bottom of the card and finished the whole thing off with one of the sentiments from Marci stamp set.  I just love how this turned out!  


Card Details:
Marci with Pen Rubber Stamp Set
Ink with Pen Die Set
Envelopes Border Die

Copic Colors:
Skin: E000, E00, E11, E04, R20
Hair: Y21, Y26
Peach: R20, R22
Red: R24, R27, R56, R59
Teal: BG10, BG11, BG13
Tan: E30, E33, E35
White: W0, W1


For my next card, I used the adorable Happy Mail Rubber stamp Set.  These little pigs are just too cute!!!  For this card, I used some of the patterned papers from the Little Merry Christmas Paper Pack.  First, I trimmed a piece of the teal paper to fit my card panel.  Then I added a strip of grey card stock to middle of my card to act as the "road."  I also added a strip of red stripped paper to the bottom.  Then I layered on the Envelopes Border and popped some of the envelopes with foam tape.  For the hearts, I colored them with my copics and added Stickles glitter.  Then I die cut the Mail Box from tan card stock and added that to the center of my card.  I colored up two of the little pigs and added them to my scene.  Then I stamped out my sentiment and popped that on top of my mail box using foam tape.  A couple of red hearts next to my scooter pig finish this card off.  


Card Details:
Happy Mail Rubber Stamp Set
Envelopes Border Die
Mail Box Die

Copic Colors:
Pigs: R000, R11, R20, E87
Red: R24, R27, R56, R59
Teal: BG10, BG11, BG13
Grey: W3, W5