Thursday, February 28, 2019

CC Designs Spring Things


Hello!  Today, I'm sharing a sweet little encouragement card using the new Spring Things Clear Stamp Set and Coordinating Dies from CC Designs.  This sweet little set has a ton of little images and sentiments perfect for spring! 

For my card, I decided to keep things simple.  I created a little spring rain scene inside of the new In and Out Rectangle Metal Die.  I love that this little set comes with some rain drops and little flowers...too cute.  I colored up my image with Copics and used the coordinating dies to cut her out.  Then I die cut some clouds in grey and layered them over a little sun peeking out from behind.  A sweet little sentiment at the bottom finishes the whole thing off. 


Thanks so much for stopping by!  

Card Details:
CC Designs In and Out Rectangle Dies: https://ccdesignsrs.com/products/new-in-out-rectangle-metal-cutter?variant=15864364695646
Spring Things Clear Stamp Set: https://ccdesignsrs.com/products/new-spring-things-clear-set?variant=15947471028318
Spring Things Outline Dies: https://ccdesignsrs.com/products/new-spring-things-outline-die?variant=15947472404574
Garden Accessories Die: https://ccdesignsrs.com/products/new-garden-accessories-die?variant=5620403306527
Banners Accessories Dies: https://ccdesignsrs.com/products/new-banners-accessories-metal-die?variant=5406159405087

Wednesday, February 27, 2019

La-La Land Crafts Take It Sloth Birthday

Hello!  I'm so excited to be sharing a fun Birthday Card using the new Take It Sloth Clear Stamp Set.  This adorable set features 4 sloths and a ton of sentiments.  

For my card, I used the NEW Harlequin Stencil to ink up the background using orange distress ink.  Then I stamped out some pink hearts using the Hearts Forever Background Stamp.  I trimmed that into a skinny rectangle and cut the end at an angle.  I adhered that on top of the harlequin pattern and layered on top a heart wreath and a scalloped heart cut out of white and purple card stock.  Then I colored up my sloth and accessories using my Copics and fussy cut them out.  I used foam tape to pop the on top and added a few enamel dots as well.  Then i stamped out my sentiment in black ink and trimmed the tails off of the Ribbon Corner Die to create steamers.  

I just love how fun this turned out.  Perfect for any celebration!  


Here's a look at the inside:


Card Details:
Take It Sloth Clear Stamp Set: https://www.lalalandcrafts.com/Take-it-Sloth-Clear-Stamp-Set_p_1014.html
Absolutely Perfect Clear Stamp Set: https://www.lalalandcrafts.com/Absolutely-Perfect-Clear-Stamp-Set_p_1003.html
Ribbon Corner Die: https://www.lalalandcrafts.com/Ribbon-Corner-Die_p_993.html

Copic Colors:
Sloth: E50, E53, E55, E57, E49
Teal: BG10, BG32, BG72
Pink: RV13, RV14, RV19
Yellow: Y32, YR12


Tuesday, February 26, 2019

La-La Land Crafts Marci with Headphones

Hello!  I'm back today sharing a fun 80's themed card using the NEW Marci with Headphones from La-La Land Crafts!  For my card, I used the new Hearts Forever Background Stamp to create a fun black and white background.  Then I layered that on top of a teal Scalloped Rectangle.  I stamped out Marci, colored her up with my Copics, and fussy cut her out. Then I layered her on top of a die cut oval that was embossed using the Harlequin Stencil.  I also add a couple strips of paper, two heart wreaths, and a couple of hearts cut from the wreaths.  


here's a look at the inside:


Card Details:
Marci with Headphones Rubber Stamp Set: https://www.lalalandcrafts.com/Marci-with-Headphones-Rubber-Stamp-_p_1013.html
Scalloped Rectangles Die: https://www.lalalandcrafts.com/Scalloped-Rectangles-Die_p_884.html

Copic Colors:
Skin: E000, E00, E11, E04, R20
Hair: E43, E47
Teal: BG10, BG11, BG15, BG32, BG72
Pink: RV13, RV14, RV19
Black: C5, C7, C10


La-La Land Crafts February Club Kit


Hello, I'm excited to be back sharing a couple of sweet little cards using the new Club La-La Land February Club Kit!  
For my card, I used some patterned paper to create a wall and floor scene.  Then I colored up my Marci and fussy cut her out.  I die cut the washing machine from some red card stock and added my embellishments in white.  Then I adhered that to my card.  I also colored up one of the kitties from the kit and tucked him inside the laundry basket.  Too cute!  To finish my card off, I added my sentiment and some enamel dots.  


Here's a look a the inside:


Card Details: 

Curved Pocket Die: https://www.lalalandcrafts.com/Curved-Pocket-Die-_p_954.html

Copic Colors: 
Hair: E15, E18, E49
Skin: E000, E00, E11, E04, R20
Green: YG09, YG62
Blue: B34, B37, B39
Dark Blue: B93, B97
Yellow: Y18, Y26
Grey: W3, W5
Red: R24, R27, R56, R59
Cat: E50, E53


For my next card, I colored up the little Laundry Cats in warm grey tones and fussy cut them out.  Then I layered up some patterned papers, create a little outside scene inside a die cut circle and layered it all on top of a white scallop.  I tucked my laundry basket and cat into my grassy border and even placed a stray little sock behind one of the blades of grass.  I stamped out my sentiment and added that to the top left corner, framing it with a couple of die cut hearts.  To finish off the whole card, I added the little clothes pin to the bottom of the card.  


Here'a a look at the inside: 


Card Details:
Grass Border Die: https://www.lalalandcrafts.com/Grass-Border-Die_p_570.html
Small Hot Air Balloon Die: https://www.lalalandcrafts.com/Small-Hot-Air-Balloon-Die-_p_998.html
Stitched Nested Circles Die: https://www.lalalandcrafts.com/Stitched-Nested-Circles-Die_p_793.html
Pierced Scalloped Circles Die: https://www.lalalandcrafts.com/Pierced-Scalloped-Circles-Die_p_789.html
Stitched Scallops Border Die: https://www.lalalandcrafts.com/Stitched-Scallops-Border-Die_p_748.html
Stitched Elements Die: https://www.lalalandcrafts.com/Stitched-Elements-Die_p_792.html

Copic Colors: 
Cats: W1, W3, W5
Yellow: Y32, Y26,
Red: R20, R22, R24
Teal: BG10, BG11, BG32
Blue: B34, B37
Green: G94


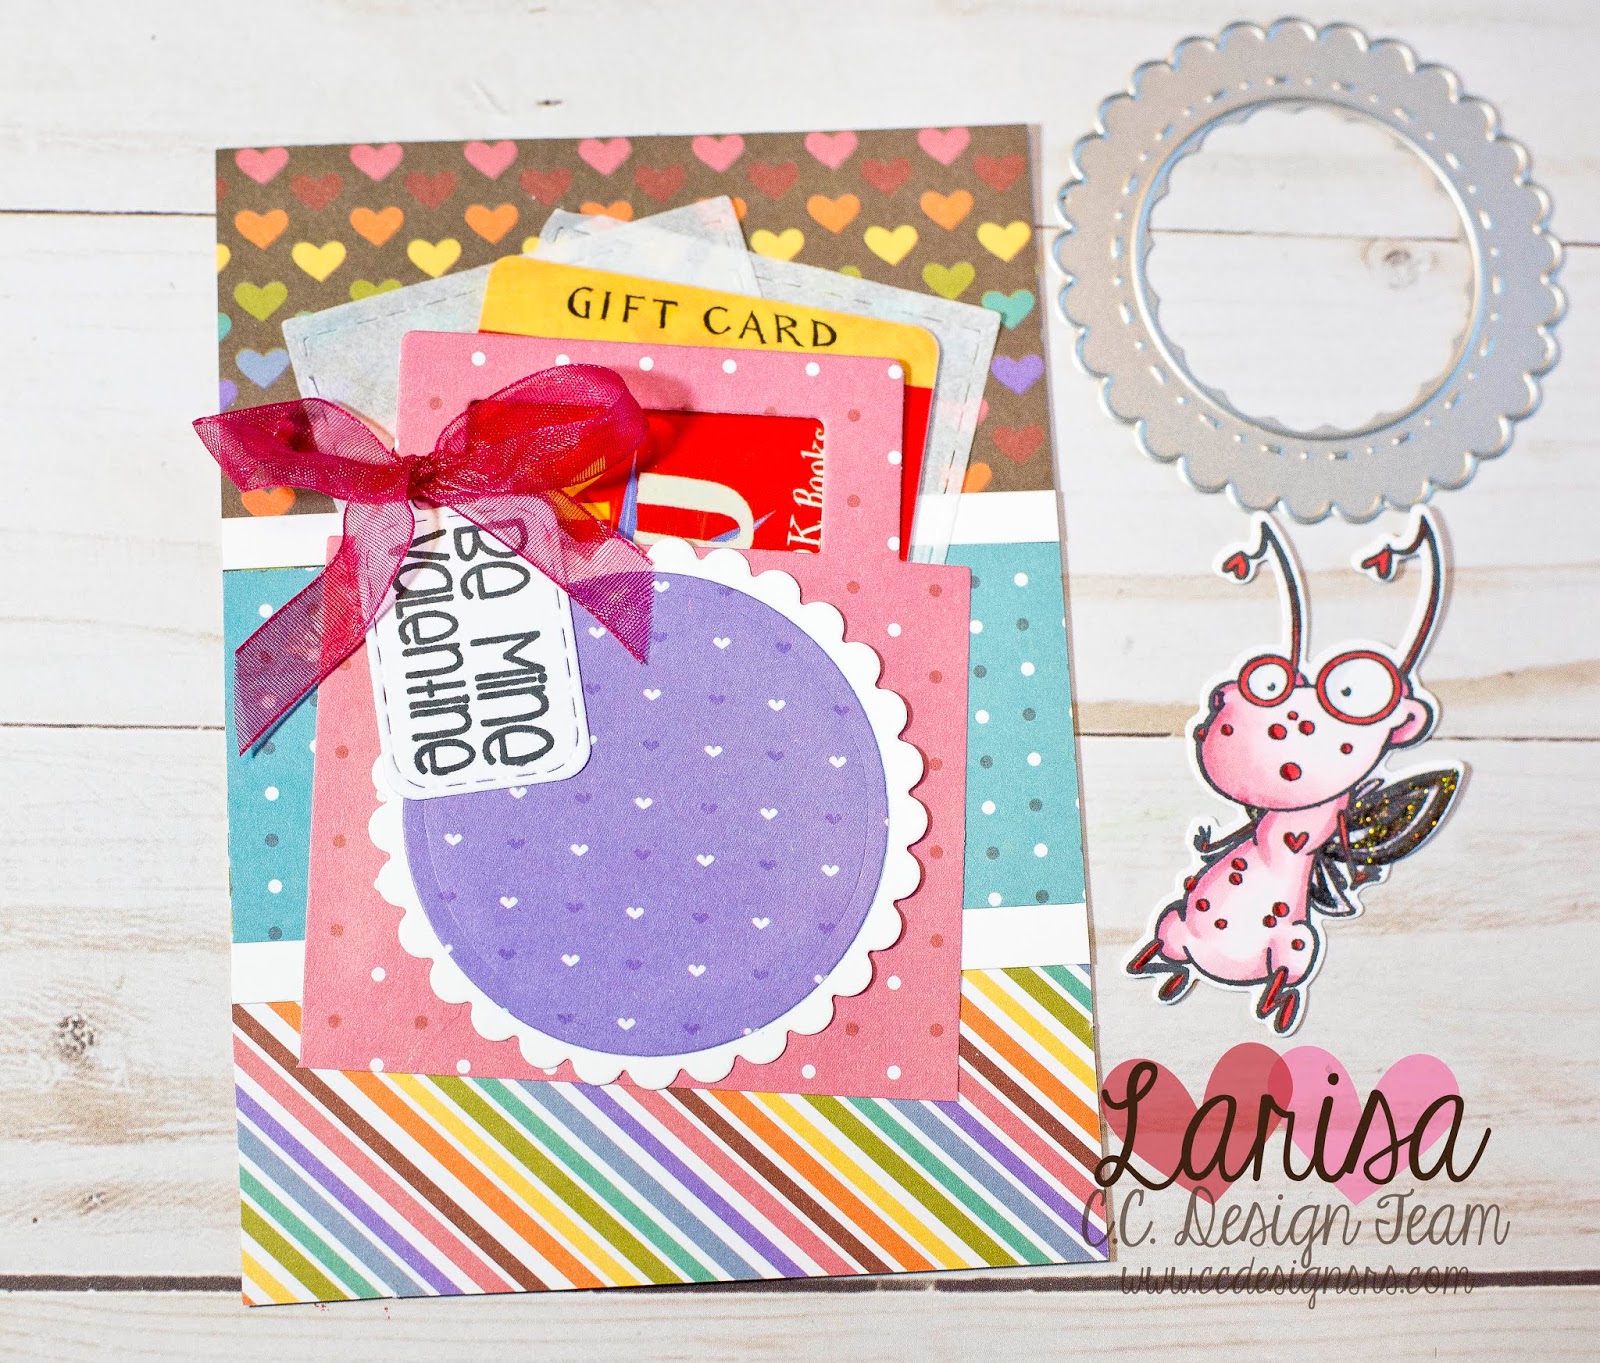
CC Designs Gift Card Tutorial

Hello! Today, I'm sharing how to use the CC Designs Treat Bag die to create a fun little Gift Card Holder.  This is perfect for any occasion!  Think...Birthdays, Easter, Teacher Gifts, etc.  


To create this card, you will need:

1. Treat Bag Die
2. Patterned Paper
3. Gift Card 
4. Colored Image (Cutie Bugs Clear Stamp Set)
5. In and Out Circle Die
6. Tissue Paper
7. Thin Sticky Tape
 8. Copic-Friendly Ink


Step 1: Trim patterned paper to fit card base.  Die cut pink paper from the Treat Bag Die.  Die cut white card stock and stamp sentiment using black ink.  


Step 2: Layer strips of patterned paper on to heart paper.  Trim bag die so that only front is showing.  Add thin adhesive to back on three sides.  Leave top open.  


Step 3: Die cut tissue paper with rectangle die that comes with the treat bag die.  


Step 4: Adhere tissue paper to card panel towards the top.  


Step 5: Adhere bag to front of card panel over tissue paper.  Use In and Out Circle Die to cut white scalloped circle.  Cut purple circle and adhere on top.  Raise up with foam tape on front of bag die.  Attach tag with ribbon.  


Step 6: Cover back of bug with foam tape.  


Step 7: Attach bug on top of circle.  Adhere panel to front of card base.  


There you have it. A fun way to give a gift card for any occasion!  

Card Details: 

Monday, February 25, 2019

La-La Land Crafts Java Nice Day!


Hello!  Today, I'm so excited to share with you a fun shaker card I made with the new Java Nice Day stamp set by La-La Land Crafts!  This adorable stamp is available HERE in the shop so be sure to pop over there and check it out along with all the new dies and stencils! 

For my card, I used the Harlequin stencil to emboss a square piece of white cardstock.  Then I stamped out the NEW Hearts Forever Background stamp in chocolate brown and trimmed it into a rectangular strip.  I layered that on top of the white cardstock and added a piece of gold metallic cardstock cut with the scallop border die.  Then I stamped out my coffee cut and created a shaker with some gold sequins inside.  I layered that on top of a chocolate brown heart and a couple of heart wreaths cut from kraft card stock.  To finish it all off, I stamped out the little "hello" sentiment from the Batty For You stamp set. 


Here's a look at the inside:


Card Details:

Copic Colors:
cup: W1, W3


Monday, February 18, 2019

CC Designs Monkey Tag

Hello!  Today, I'm sharing a fun birthday gift tag using the NEW Monkeys Stamp and Die set by CC Designs.  This new set is so much fun to create with and I just love how it can be used for so many different occasions!  I'm also featuring the new paper pads and enamel dots that were released as well.  

To create my tag, I die cut some striped patterned paper with the Tags Galore Die set.  Then I cut another one with orange patterned paper and trimmed the top with a scallop die.  I layered that piece on top of my striped tag and glued the two together.  Then I cut the reinforcer out of green cardstock and adhered that into place.  I used a circle die to cut a blue circle from patterned paper as well and adhered that to my tag.  I stamped out my monkey, colored him up with Copics and die cut him out using the coordinating dies.  My stamped sentiment and some enamel dots finish it off.  


Thank you so much for stopping by! Have a great day!