Monday, October 26, 2020

La-La Land Crafts: Black, White, and Pink


Hello there!  Now that Halloween is almost here, it's time to start making Christmas Cards! lol!  This week's theme at La-La Land Crafts is Black, White, and one other color.  I decided to make a cute little holiday card for a particular dog-lover I know.  I used the pretty patterned papers from the Christmas Hodgepodge Paper Pack, die cut them out and layered them all together.  Then I added some die cut trees, a sentiment banner, and my little doggie.  A few clear enamel dots finish it off.  

Card Details:


Copic Colors:
Black: W5, W7, w9
Pink: R00, R11
White: W0, W1


Thursday, October 22, 2020

CC Designs Tiny Wisemen Shepherd

Hello!  Today, I'm so excited to share another card using the NEW Tiny Wisemen Stamp from CC Designs.  This set is so much fun and absolutely adorable.  To create my card, Used some papers and dies in my stash.  Then I colored up my image, fussy cut him out, and popped him on top of my scene using some foam tape.  A super easy card to put together, but I just love how it turned out!  


Card Details:


Wednesday, October 21, 2020

Stacey Yacula Halloween!

Hello,
Today, I'm sharing a cute little card featuring some Halloween images from Stacey Yacula.  This card combines sets from My Favorite Things and Purple Onion Designs.  I love that even though she designs for 2 different companies, her images seamlessly work together.  For this card, I started with a piece of white card stock.  I stamped out my background images, masked them off, and used Distress Inks and Copics to color in the background.  Then I removed the masks and finished coloring the images.  Then I colored up my focal images, fussy cut them out, and popped them onto my scene using foam tape.  Some added highlights with a white gel pen finish it off.  Have I mentioned how much I love Halloween? lol!


Card Details:

Tuesday, October 20, 2020

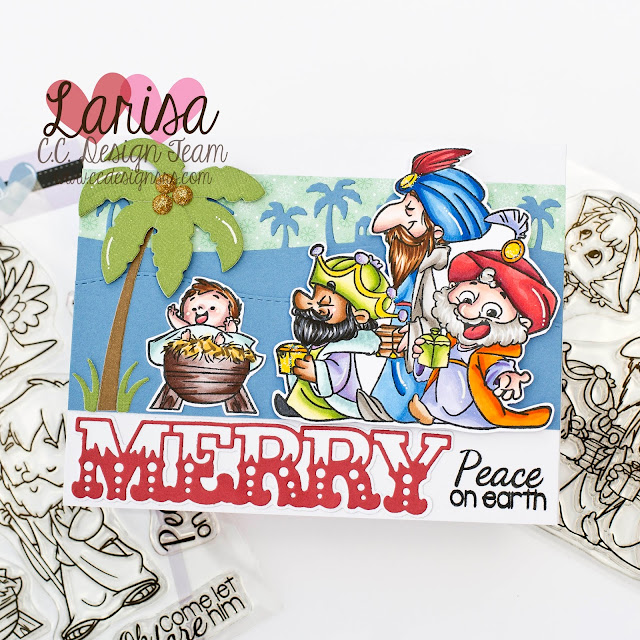
CC Designs Peace On Earth

Hello! Today, I'm sharing a bright, festive holiday card featuring 2 of the new stamp sets from CC Designs.  These sets pair perfectly together and I couldn't resist making something that combined the two.  For my card, I started with some blue card stock and die cut it using a background die from my stash.  Then i layered that on top of some snowflake paper from Doodlebug.  I added my colored images to the bottom using foam tape and added a die cut palm tree to the left side.  Then I stamped my sentiment across the bottom and added the Merry Word die cut from red card stock.  I just love how this turned out.  Such a great way to celebrate the Christmas Season!  


Card Details:


Monday, October 19, 2020

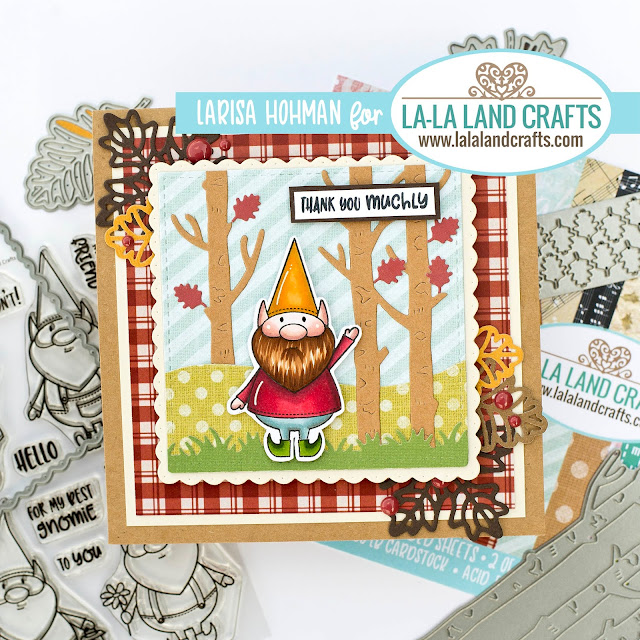
La-La Land Crafts: Fall

Hello!  Hope you are having a great Monday!  Today, I'm sharing a fun fall card for this week's theme at La-La Land Crafts.  I created a little fall scene using several dies and patterned papers.  Then I popped it up on foam tape, added it to my red plaid paper and tucked a few die cut leaves into the corners.  I just love how this turned out!  So much fun!


Card Details:
Best Gnomies Clear Stamp Set: https://www.lalalandcrafts.com/Best-Gnomies-Clear-Stamp-Set-_p_1025.html
Christmas Hodgepodge Paper Pack: https://www.lalalandcrafts.com/Christmas-Hodgepodge-Paper-Pack_p_1112.html
Filigree Leaves Die: https://www.lalalandcrafts.com/Filigree-Leaves-Die_p_932.html
Leaves Confetti Die: https://www.lalalandcrafts.com/Leaves-Confetti-Die_p_933.html
Birch Trees Die: https://www.lalalandcrafts.com/Birch-Trees-Die_p_766.html
Mushroom and Grass Border Die: https://www.lalalandcrafts.com/Mushroom-and-Grass-Border-Die-_p_1031.html
Double Stitched Hills Border Die: https://www.lalalandcrafts.com/Double-Stitched-Hills-Border-Die_p_704.html
Double Stitched Squares Die: https://www.lalalandcrafts.com/Double-Stitched-Squares-Die_p_782.html
Scalloped Squares Die: https://www.lalalandcrafts.com/Scalloped-Squares-Die_p_2321.html


Copic Colors:
Skin: E000, E00, E11, E04, R20
Hair: E35, E37, E49
Red: R35, R56, R59
Blue: BG10, BG11, BG57
Green: YG21, YG25, YG67
Yellow: Y23, Y26


Friday, October 16, 2020

Not 2 Shabby Shop Pumpkins

Hello!  Today, I have a sweet little Fall card to share with you guys.  Today, I'm featuring the Not2Shabby Pumpkin Spice Digital Stamp Set as well as the Not2Shabby Woodland Buddies Clear Stamp Set.  I just love that these two sets mix and match so easily!  For my card, I layered up some patterned paper, added some die cut grass in a light tan and popped my colored images on top with some foam tape.  Then I added some gold glitter washi and a sticker sentiment strip.  Such a fun way to welcome in the Fall Season!  


Card Details:


Thursday, October 15, 2020

CC Designs Tiny Angels

 Hello!  Hope you are having a great week!  Today, I'm sharing a super fun new set from CC Designs called Tiny Angels.  These little angels are celebrating and singing their hearts out!  To create my card, I used a background die from my stash, cut it out from card stock and inked it up with Distress Inks.  Then I pieced it all together.  I stamped out my angels, colored them up with Copics, and fussy cut them out.  Then I popped them onto my scene using foam tape.  A few enamel dots, and Stickles glitter add some sparkle and shine.  To finish everything off, I stamped my sentiment at the bottom of the card!  


Card Details:

Wednesday, October 14, 2020

A Bee-utiful New Release from Picket Fence Studios!

 Hello!  Today, I'm so excited to share a few cards with you featuring the NEW RELEASE at Picket Fence Studios!  All the new goodies are AVAILABLE NOW so hop over there and check them out.  This month is packed full of fabulous products and I'm excited to say, the DIES ARE BACK!  Trust me, you do not want to miss this!  So, let's get started.  

For my first card, I created a sweet slimline card featuring the NEW Slimline Rainbows Stencil.  I used my Life-Changing Blender Brushes to ink it up with some Spun Sugar Distress Ink.  I added a bit of green card stock to the bottom to simulate grass.  Then I die cut my panel into a scalloped rectangle and adhered that to a piece of black card stock.  I die cut the NEW A Tree Die from some green card stock and adhered that to the center of my panel.  It's a little off center to add some interest.  For my image, I stamped, colored, and die cut the NEW Honey Dear Clear Stamp Set.  Isn't it just the cutest thing! I used foam tape with pop her on the bottom of my card.  Then I worked on my sentiment.  The NEW Thank You For Being You Clear Stamp Set is so versatile and I thought I would coordinate perfectly with this card.  So, I stamped and embossed it at the top and added the little phrase just underneath popped up on some foam tape.  A few enamel hearts, some Stickles Glitter, and white highlights using my gel pen finish this card off.  


For my next Bee-Themed Card, I used the NEW Buzz Stamp Set.  This seamless stamp is designed so that you can stamp it endless times and it always lines up.  However, you can also just stamp it once to create the perfect frame for your card.  For this project, I stamped it out on some light yellow card stock using some darker yellow ink from my stash.  Then I heat embossed it using clear embossing powder.  It really made the image pop and I like it so much, I decided to emboss my girl image and bees too!  I stamped them both out with Hybrid Black Ink and then embossed them with clear embossing powder.  I did some very simple Copic Coloring, cut them out with the coordinating dies and popped them on top with some foam tape.  Then I used the NEW Thank You For Being You set again and stamped my sentiment just under my bee frame.  


For my final Bee Card, I used the NEW I Bee Fierce Clear Stamp Set and Coordinating Dies.  To begin, I stared with some simple black and white patterned paper and trimmed it into a rectangle.  Then I anchored each side with a strip of black card stock die cut into scalloped trim.  I also die cut a large flower from the back card stock and adhered that to the center of the panel.  Then, I used my Daffodil Paper Glaze to create a fun little background with the NEW Honeycomb Stencil. After it was dry, I die cut it into a circle and popped it onto my black flower shape using foam tape.  I stamped, colored, and die cut my bees.  Then I randomly placed them about the card and added some with foam tape for dimension.  A sweet sentiment and some pretty Gin and Tonic Sequins finish this card off.  


Thank you so much for joining be today!  Be sure to stop by the Picket Fence Studios Shop to check out all the new goodies!  You are going to love them!

Products Used:


Monday, October 12, 2020

La-La Land Crafts: Spooky

 Hello!  Halloween is just around the corner and today I have a fun little Spooky card to share with you guys!  The theme at La-La Land Crafts this week is SPOOKY.  For my card, I created a fun little scene that's probably a little more cute than spooky!  I used several dies to create my little scene and added some polkadot patterned paper to the background.  Then, I colored up my image, fussy cut her out, and popped her on top using some foam tape!  


Card Details:
Happy Boo To You Clear Stamp Set: https://www.lalalandcrafts.com/Happy-Boo-to-You-Clear-Stamp-Set-_p_927.html
Love You More Paper Pack: https://www.lalalandcrafts.com/Love-You-More-Paper-Pack_p_1161.html
Double Stitched Rectangles Die: https://www.lalalandcrafts.com/Double-Stitched-Rectangles-Die_p_2323.html
Scalloped Rectangles Die: https://www.lalalandcrafts.com/Scalloped-Rectangles-Die_p_884.html
Stitched Nested Circles Die: https://www.lalalandcrafts.com/Stitched-Nested-Circles-Die_p_793.html
Frightful Fence Die: https://www.lalalandcrafts.com/Frightful-Fence-Die_p_713.html
Ghosts Die: https://www.lalalandcrafts.com/Ghosts-Die_p_317.html
Mushroom and Grass Border Die: https://www.lalalandcrafts.com/Mushroom-and-Grass-Border-Die-_p_1031.html
Boo! Die: https://www.lalalandcrafts.com/Boo-Die_p_935.html

Copic Colors:
Skin: E000, E00, E11,E04, R20
Hair: Y21, Y26, E87
Purple: BV00, BV13
Orange: YR04, YR16, YR27
Green:YG21, YG23, YG67
Black: C5, C7


Thursday, October 8, 2020

La La Land Crafts Tutorial: Using Your Scraps

Hello, today, I'm sharing a fun tutorial.  La-La Land Crafts has so many amazing paper pads!  But what if you have a bunch of scraps and none of them are big enough to make a full-sized card?  Well, you can use them up by making Gift Enclosures!  This cute little 3x3 mini cards are the perfect way to use up your scraps!  


First, you'll want to collect your scraps.  I'm using a bunch of scraps from the Hello Life Paper Pack.  This is one of my absolute FAVORITE paper packs and I have used up all of my full-sized sheets, but I have a ton of scraps that I'm going to use for my project today.  


Step#1: Trim white heavy-weight card stock into 3x3 card bases.  You can score them so that they are top fold or side fold.  Both ways are cute!  
Step #2: Find your larger scraps and trim them into squares that are 2.75x2.75.  These will be layered on top of your card bases.  
Step #3: Use your Scalloped Squares Die to cut out some white card stock.  I used the second-to-smallest size in the set.  Then use the Double Stitched Squares Die to cut some patterned paper.  Again, I used the second-to-smallest size in the set.  


Step #4: Stamp, color, and fussy cut your image.  I'm using the Squeeze The Day Clear Stamp Set.  (Copic colors listed below)
Step #5: Use foam tape to adhere the layers together.  Because these are very small, I like to add lots of dimension to add interest.  


Step #6: Adhere the whole thing to the top of your card base and add your sentiment.  
Step #7: Add die cuts and use your scraps.  Try to choose patterns that are more neutral so that your eye can focus when you layer it all together.  


Copic Colors:
Mice: W0, W1, W3, W5, R21
Yellow: Y23, Y26
Blue: BG10, BG11, BG72
Pink: RV10, RV21

Thanks so much for stopping by!  I can't wait to see what you make with your scraps!  


Wednesday, October 7, 2020

CC Designs Singing Angel Swissie

 Hello!  Today, I'm so excited to share a sweet holiday card featuring one of the new stamps from CC Designs.  This is Singing Angel Swissie and she is available in the shop now!  To create my card, I started with some black and white patterned paper and added some snowy slopes to the bottom.  Then I adhered it to the front of my card panel and added some gold glitter paper strips on each side.  Then I colored up my image, fussy cut her out and popped her on top using some foam tape.  I also added some die cut snowflakes, some glitter enamel dots, and my sentiment.  I just love how this turned out!  


Card Details:


Monday, October 5, 2020

La-La Land Crafts New Release

 Hello!  This week's theme at La-La Land Crafts is The New Release!  For my card, I decided to go with a book theme.  I thought this would make an adorable "thank you" card for my son's teacher!  First, I layered up some patterned papers, Then I colored up my images, fussy cut them out, and popped them on top of some die cut squares.  I also added the die cut bookmark as one of my layers and finished it off with my little die cut sentiment.  


Card Details:
One More Chapter Clear Stamp Set: https://www.lalalandcrafts.com/One-More-Chapter-Clear-Stamp-Set_p_2336.html
Asian Fusion Paper Pack: https://www.lalalandcrafts.com/Asian-Fusion-Paper-Pack_p_2333.html
Scalloped Squares Die: https://www.lalalandcrafts.com/Scalloped-Squares-Die_p_2321.html
Book Mark Die: https://www.lalalandcrafts.com/Bookmark-Die_p_2310.html
I Love Books Die: https://www.lalalandcrafts.com/I-love-Books-Die-_p_2313.html
Blue Christmas Paper Pack: https://www.lalalandcrafts.com/Blue-Christmas-Paper-Pack_p_1113.html
Double Stitched Squares Die: https://www.lalalandcrafts.com/Double-Stitched-Squares-Die_p_782.html

Copic Colors:
Pig: R00, R11, R20, E97
Mouse: W0, W1, W3, R00
Owl: E30, E31, E33, E34, E35, E37
Bunny: E50, E53, R00
Red: R24, E27, R56
Blue: B21, B24, B29
Yellow: Y32, Y29