Wednesday, December 16, 2020

Bright and Colorful Scene Cards!

 Hello!  Today, I have two very bright and very colorful scene cards to share with you!  For my first card, I paired A Walk in the Park with Bugville.  I stamped out my park scene and masked it off.  Then I stamped Bugville in the background.  I colored up the scene with copics and trimmed it to fit my A2 size card.  Then I stenciled in my sun with distress inks.  A very vibrant way to say, "hello!"


For my second card, I used the Slimline Die cutting system and cut 2 birch tree panel from the center.  Then I stenciled in some clouds and stamped my grass on a separate piece of paper.  I trimmed that to fit behind my card panel and adhered the two pieces together.  Then I mounted that on a piece of teal card stock.  I stamped out my flower and leaf images on Copic-friendly card stock and colored them up.  Then I die cut them out using the coordinating dies and popped them on top of my card front.  The "happy birthday" sentiment across the top finishes it off.  


Products Used:

Monday, December 14, 2020

CC Designs Penguin Slimline Card

Hello!  Just a few more days till Christmas and today, I'm sharing a sweet little Slimline Card perfect for the holiday season.  Be sure to hop over to the CC Designs Shop and check out the NEW Release!  Tons a fabulous goodies there as well as some great deals on retiring products.

For my card, I used the New Slimline Die Sets and paired them with the NEW Penguins clear stamp and coordinating die sets.  I used some fun patterned papers, cut them out, and layered them up.  Then I created some little scenes inside of my Deco Square shapes.  Then I added them to my card base, used some foam tape to attach my penguins and stamped my sentiment.  So fun!  


Card Details:


Picket Fence Studios December 2020 Release!!

 Hello!  It's release Day at Picket Fence Studios!  As always, there are a ton of fabulous goodies available in the shop now.  Be sure to hop over there and check them out!  

For my first card, I used the NEW Slimline Waves Stencil and paired it with some Paper Glaze in Ocean Poppy.  Then I stamped the microphone image and fussy cut it out.  I shaded it a bit with my Copic Markers, then adhered it to the top of my card panel which was cut using the Slimline Die Cutting System.  Then I stamped out my sentiments, heat embossed them and added them to the bottom of my card with some foam tape.  Some Gin and Tonic Sequins finish off this card.  


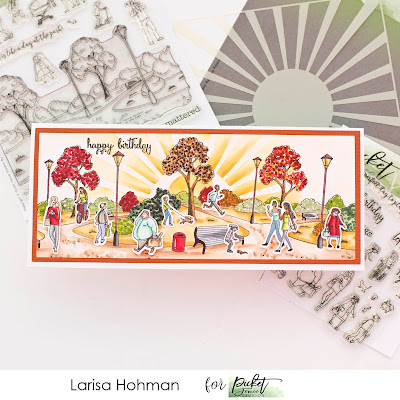
For my second card, I decided to work with both of the NEW Walk in the Park stamps.  I used the Slimline Die Cutting System to cut my card panel and orange background layer.  Then I stamped my park image twice to fill the card.  It doesn't match up exactly, but it's very close and I was able to disguise the overlap with a few of my people images.  I stenciled in the sunrise using the NEW Burst of Sun Stencil.  I also used the Corner Sun Stencil to fill in the middle of the sunrise.  After coloring up the scene with Copics, I used the coordinating die set to cut out my people and layered them on top of the scene using liquid glue and foam tape.  I just love how this turned out!!!  


My final card features a winter scene with the Walk in the Park set.  I love that you can color up this image to fit any season!  First, I stamped out the park scene.  Then I masked it off and added my clouds with the NEW Slimline Cloud Coverage Stencil.  Then I removed the mask and colored the whole think in with Copic markers.  I added snow to the tops of the trees and bushes by leaving them white and adding a little Stickles glitter to them.  Then I stamped out my people, used the coordinating dies to cut them out, and added them to my scene using foam tape.  Some white paint splatters and a sentiment across the top finish it off.  


Products Used:


Friday, December 11, 2020

La-La Land Crafts 14 Days of Christmas : Day 8


La-La Land Crafts 14 Days of Christmas Day 8


Hello everyone! Welcome to DAY 8 of the annual La-La Land Crafts 14 Days of Christmas!

Today, I'm sharing a tutorial on how to create a quick and easy Treat Holder.  

Today's tutorial is: Winter Piggies Treat Holder

I find myself creating all sorts of treats for friends, co-workers, teachers, etc. during the holidays.  These quick and easy treat holders are the perfect holiday gift, especially if you need to make a bunch of them! 

PRODUCTS USED

Winter Piggies Clear Stamp Set
Home For Christmas Paper Pack

COPIC COLORS

Pig: R00, R11, R20, R21, E97
Red: R35, R37, R56, R58
Black: W5, W7
Teal: BG10, BG13, BG72
Poinsettia: W2

PAPER CUTS & SCORING

White Card Stock: Cut at 1 3/4 inches by 2 1/2 inches
Score at 1/2 inches and 1 1/2 inches
Cut two Tags from Plaid Paper (second to smallest size)
Cut two Tags from white card stock (second to smallest size)
Cut one Stitched Rectangle from Wood Paper (middle size) 
Cut one Poinsettia from white card stock
Cut one Poinsettia center from yellow card stock

~ now for the tutorial you have been waiting for ~ 

Adhere each of the plaid tags to the white card stock tags so that they line up perfectly.  

Adhere the scored rectangle at the bottom white side of each tag so that the two piece are connected white sides facing in.   


Using strong adhesive (double-sided tape), attach back of candy to the inside of the treat holder (white side).  


Thread decorative ribbon through the holes at the top of both tags.  Tie a bow, closing the treat holder.  

Decorate the front of the treat holder.  Using foam tape, adhered stitched rectangle wood panel to the center of the front tag (the one without candy attached).  

Use W2 Copic marker and Stickles Glitter Glue to decorate poinsettia.  Layer together and adhere to the left side of the wood piece.  Trim off any excess that overlaps on the bottom so that treat holder will stand up.  

Stamp and color pig image.  Fussy cut him out and adhered him to the right side of poinsettia using foam tape.  

Stamp Sentiment in black ink on white card stock.  Use washi tape to mask off portion of sentiment so that only "warm hugs" stamps.  Trim into rectangle.  Adhered to top of wood rectangle using foam tape.  


We hope that you are inspired to try out your own creation with the amazing stamps and dies from La-La Land Crafts! 

Make sure to join our LLLC FAN GROUP on Facebook for more ideas, 
inspiration and a general chit chat about our products!

Hoping you all have a great week of creating

Larisa 

Click on the buttons below to find us on these social media sites:


Thursday, December 10, 2020

CC Designs Ice Skate Fun

 Hello!  Today, I'm sharing a fun little slimline card using the NEW Ice Skate Fun Clear Stamp and Coordinating Die Set from CC Designs


To create my card, I combined all the the new Slimline Dies to create my winter scene from card stock.  Then I stamped out my images, colored them up with Copics, and cut them out using the coordinating dies.  With foam tape, I adhered the little skaters onto my card and added a sweet little sentiment to the top left corner.  Some Stickles Glitter and a white gel pen finish this card off.  

Card Details: