Monday, August 31, 2020

La-La Land Crafts Patterned Paper

Hello,
Have you seen all the fabulous patterned papers at La-L Land Crafts?  This week the theme is just that...Patterned Paper.  For my card, I used the Dear Santa Clear Stamp Set and paired it with the Little Merry Christmas Paper Pack.  So fun!  


Card Details:

Copic Colors:
Skin: E000, E00, E11, E04, R20
Red: R24, R27, R56, R59
Brown: E35, E37, E57
Black: C5, C7, C9
White: C1, C3, C5

Monday, August 24, 2020

La-La Land Crafts Stencils

Hello!  I'm getting a head start on my Christmas Cards.  This week the theme at La-La Land Crafts is Stencils!  For my card, I created a sweet little scene with elves using the Snowy Hills Layering Stencil.  I added some trees, snow, three little elves and a fun little sentiment.  


Card Details:

Copic Colors:
Skin: E000, E00, E11, E04, R20
Red: R24, R27, R56, R59
Green: YG21, YG25, YG67
Teal: BG10, BG11, BG13


Tuesday, August 18, 2020

CC Designs Queen of Hearts

Hello!  Today, I'm sharing a very fun card using the NEW Queen of Hearts Clear Stamp set from CC Designs.  You can find all the NEW Goodies in the shop HERE.  

For my card, I started with a piece of white card stock and trimmed it to fit the top of my card.  Then I used the NEW Wonderland Paper Pad and trimmed a sheet of this whimsical paper into a skinny rectangle.  I adhered that to the right side of paper.  I used the New Snapshot Metal Die to cut a black frame and stamped my sentiment in the middle.  I also added some of the hearts from the die as well.  Then, I stamped out my image, colored her up and fussy cut her out.  Using some foam tape, I added her to the far right side of the card.  A few heart shaped enamel dots finish this card off.  


Card Details:

Monday, August 17, 2020

La-La Land Crafts Outdoors

Hello there!  Hope you're Monday is going well.  Today, I'm sharing an Outdoors themed card using some adorable products from La-La Land Crafts!  For my card, I started with some patterned paper and trimmed that to fit just on top of the largest scalloped rectangle die cut from pink card stock.  Then I added a die cut sun, some clouds, and my sentiment.  I colored up this sweet little duck using a no line coloring technique.  Then I fussy cut it out and popped it on top using some foam tape.  Such a sweet way to brighten someone's day!


Card Details:

Copic Colors:
Duck: Y21, Y26
Pink: RV00, RV11, RV21
Green: YG21, YG25, YG67
Orange: YR04, YR16, YR27

Friday, August 14, 2020

Picket Fence Studios August 2020 Release!!!

Hello, hello!  It's release day at Picket Fence Studios!!!!  So many awesome stamps, dies, sequins, etc. released this month!!! Be sure to stop by the shop and check out all the new goodies!!!  Today, I've created four cards for you guys featuring some of these new products.  So, let's get started!  

My first card features the NEW Mandala Stamp.  How beautiful is this!!! To create my card, I started with a piece of white card stock and trimmed it to fit my card base.  Then I die cut a rectangle from some orange striped paper and adhered that towards the top of the panel.  I stamped out my Mandala and colored it in with Copic Markers.  Then I fussy cut it out and glued it to the center of my striped rectangle.  I stamped my sentiment just underneath from the NEW A World of Octobers Stamp Set. How great is that sentiment!  A total MUST HAVE!  Then I added BFF Girl Ava.  I stamped her out, colored her up, and cut her out with the coordinating die.  Then I popped her on top of my card using foam tape.   To finish the whole thing off, I scattered some of the NEW Bourbon Maple Splash Sequins around my card and adhered them down.  I even layered some of the smaller ones on top and I just love how it looks!  


Card Details:


My next card features the New and completely awesome A Spooky Day Stamp Set.  To create my card, I started with a piece of white card stock and trimmed it to fit by card base.  Then I stamped out my house, trick or treaters, and clouds.  I used Copic Markers to color in my scene.  Then, I added some distress inks to the edges of the card using The Life Changing Blending Brushes.  To finish the card off, I heat embossed my sentiment in white.  Such a fun and spooky card!  


Card Details:

My final card features the NEW So Franken Cute Stamp Set.  I just love the look on his face.  I couldn't help but to create something bright and cheery in order to give him a whimsical look.  To begin, I started with some patterned paper in my stash.  I layered that up to create an award banner look and adhered that to the center of my card panel.  Then, I stamped out my Frankenstein image and colored him up with Copic Markers.  I fussy cut him out and popped him in the center with some foam tape.  Then I stamped out my sentiment and added it just under his chin.  A few glitter bats finish off this silly, but oh-so-cute card.  


Card Details:

Thanks so much for stopping by!  Hope you have a great day!!!!  


Wednesday, August 12, 2020

CC Designs Autumn

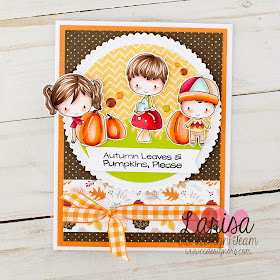
Hello there!  Today, I'm stopping by to share a fun little fall card featuring the new stamp set by CC Designs.  These little cuties are part of the Autumn Set.  Aren't they adorable!  To create my cared, I started with some patterned paper and trimmed it to fit the front of my card.  Then I mounted that on top of some orange card stock.  I also added a strip of leaf paper and some ribbon to the bottom before adhering it to my card.  Then I die cut a circle from some yellow paper and added a grassy border across the bottom.  I colored up my little images, cut them out, and popped them onto my card using foam tape.  A few enamel dots and my sentiment finish it off.  


Card Details:


Lovely Summer Card with Larisa

Hello!  Today I have a lovely summer card to share with you.  As school is starting back and summer is winding down, I thought it would be fitting to create a card using this Beautiful Girl Kendyll Stamp and Lovely Word Die


 To create my card, I started with some patterned papers in my stash.  The background paper is a white ship-lap pattern.  I trimmed that to fit the front of my card base.  Then I die cut a stitched square from blue striped paper and mounted that on a piece of grey card stock.  I adhered that towards the top of my card.  Then I trimmed a piece of red polka dot paper and layered that underneath.  Using the Lovely Die, I die cut the word from navy blue card stock and layered that on top of a white background layer, cut with the same die set.  By the way, I absolutely LOVE this die.  I will probably be using it on all sort of cards in the future.  Just a head up. LOL.  For my image, I stamped the girl out in tan ink on Copic-friendly paper.  Then I used Copic Markers to color her in.  For her eyes and eyebrows, I used a Copic Multi-liner.  After, I was finished coloring, I used the coordinating die to cut her out and popped her on my card using foam tape.  I layered the Lovely Word Die on top with foam tape as well.  And there you have it.  One Lovely Summer Card.  


Beautiful Girl - Kendyll


Kendyll Girl Coordinating Die


Lovely Word Die


Copic Colors:
Skin: E000, E00, E11, E04, R20
Hair: E43, E47, E49
Red: R35, R37, R56, R59
White: W0, W1, W3
White Flower: E50, E53, E33
Green: YG21, YG23, YG25
Brown Drink: E35, E57

Thanks so much for stopping by!  Have a great day!  

Monday, August 10, 2020

La-La Land Crafts Masculine


Hello!  Today, I'm sharing a Masculine Card to fit the theme this week at La-La Land Crafts.  For my card, I decided to go with a rock'n roll theme.  First, I started with some musical note patterned paper and added a strip of Kraft card stock to the bottom.  Then I die cut a large star out of teal paper and added that to the background.  I also included a red curtain, complete with yellow stars as well as a music note border across the bottom.  Then I colored up my image, fussy cut him out, and popped him on top using some foam tape.  My sentiment and some enamel dots finish it off.  


Card Details:

Copic Colors:
Skin: E000, E00, E11, E04, R20
Hair: E43, E47
Green:YG21, YG23
Red: R24, R56
Yellow: Y21, Y26
Brown: E35, E57
Blue: B21, B24

Wednesday, August 5, 2020

CC Designs August 2020 Release Preview Day #2

Hello!  I'm back today with another sneak peek of the August 2020 CC Designs Release!  Today, I'm featuring a new set called Wonderland.  So adorable!  For my card, I used the Quad Collage Die and cut it out of some white card stock.  Then I inked up each panel with a cloud stencil and added some grass.  I stamped out my images, colored them with Copics, and fussy cut them out.  Then I popped them onto my card using foam tape.  The banner sentiment across the middle is from Doodlebug and I also added some die cut mushrooms and some enamel dots.  To finish the whole thing off, I popped it onto some blue patterned paper and will be released as well.  


Thanks so much for stopping by!  Have a great day!!!

Card Details:


Tuesday, August 4, 2020

CC Designs August 2020 Release Preview Day #1

Hello!  It's time for the NEW CC Designs August Release!  Today, I'm a giving you a sneak peek at one of the new stamps sets.  She's called Ari and she's absolutely adorable!  
To create my card, I started with a piece of white card stock and trimmed it to fit the front of my card.  Then I used some Doodlebug paper in my stash and trimmed it into a large rectangle.  I added that to background and die cut a purple scallop to adhere just below it.  My seaweed is actually a retired CC Designs Icicle die turned upside down.  Then I colored up my images, fussy cut them out and popped them up on my card using some foam tape.  To finish it off, I stamped out my sentiment and added a few iridescent bubbles.  


Thanks so much for stopping by!  Have a great day!!!

Card Details:


Monday, August 3, 2020

La-La Land Crafts Christmas

Hello there!  Less than 6 months away from Christmas.  Have you started making holiday cards yet?  This week's theme at La-La Land Crafts is Christmas so I decided to make a cute little santa card.  First I started with some black snowflake patterned paper and mounted that on top of a black die cut scalloped rectangle.  Then I trimmed a piece of kraft card stock into a rectangle and stamped out a brick pattern on it.  I also die cut my chimney top from the same kraft card stock and used my Copic markers to add some definition and detail.  Then I colored up my santa, fussy cut him out, and popped him on top of my card using foam tape.  I also added a die cut branch to the top as well as a red glittered bow.  To finish it all off, I stamped my sentiment in black across the bottom.  


Card Details:

Copic Colors:
Skin: E000, E00, E11, E04, R20
White: W0, W1, W3
Red: R24, R56, R59
Black: C5, C7, C9
Green: YG21, YG23, YG67