Monday, June 29, 2020

La-La Land Crafts Birthday!

Hello there!  Today, I have a fun little birthday card to share with you!  I'm always in need of birthday cards and the theme this week at La-La Land Crafts is just that...birthday!  For my card, I started with a strip of cloud patterned paper and adhered that to the right side of my card panel.  Then I die cut a scalloped border from the red polka dot paper and added that to the side.  I stamped out my little pup, colored him up with Copics, and fussy cut him out.  Then I added him to the bottom of my card along with a die cut fence panel and a little patch of grass.  I die cut the sun from some yellow card stock and added that to the top left of the card.  I die cut a couple of clouds and stamped my sentiment inside the largest one.  Then I added them to my card using foam tape.  This card came together pretty quickly and would be a good design for mass-producing birthday cards!  


Card Details:

Copic Colors:
Dog: C5, C7, C9, C1, C3
Ears: R00, R11, R20
Red: R22, R24, R29


Saturday, June 27, 2020

Not 2 Shabby Shop Farmer's Market Digi

Hi!  Today, I'm sharing a sweet little Farmer's Market Card using the NEW Digi set from Not2ShabbyShop!  You can find the new set HERE!  For my card, I started with some chicken wire patterned paper and trimmed it to fit my card base.  Then I printed out my Farmer's Market Digi Stamp and Colored it up with Copics.  I fussy cut it out and adhered it to the center of my card panel.  Then I added some die cut grass to the bottom and this cute little girl from MFT.  A super easy card that makes a big statement!  


Card Details: 
MFT Green Pastures Stamp (Retired)
m

Friday, June 26, 2020

CC Designs Teen Swissie

Hello!  Hope you had a great week!  Today, I'm sharing Teen Swissie from CC Designs.  To create this card, I just colored up my image using the no lines technique.  Then I fussy cut it out and popped it on top of this cool patterned paper.  A few enamel dots and a fun sentiment at the top finish off this cool card!  


Card Details:


Monday, June 22, 2020

La-La Land Crafts 3D Project

Hello there!  Today, I'm sharing a little 3D suitcase tag set I created for La-La Land Crafts.  This sweet little suitcase it a die set in their shop and it makes creating this little box a breeze.  I just die cut my suitcase from heavy white card stock.  Assembled it together and then added some patterned papers, die cuts, and my image.  I also die cut a couple of tags that fit perfectly inside the box.  This would be a sweet little gift to give a friend with a little gift card tucked inside.  How fun!


Card Details:
 
Copic Colors:
Black: C3, C5, C7, C9
White: C0, C1
Orange: YR04, YR07, YR15
Pink: RV10, RV21
Blue: BG10, BG11, BG13
Yellow: Y21, Y26


Saturday, June 20, 2020

Sweet November Mermaids!

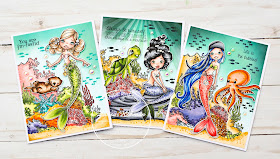
Hello!  Today, I am so excited to share some Sweet November mermaid cards with you guys!  I can't tell you how excited I am about how these turned out.  I've had this digital stamps in my stash for quite some time and this week I was determined to create something with them.  I dug through my stash and found a Retired Kraftin' Kimmie Ocean Background Stamp.  I though it would be the perfect fit for these mermaids.  So I stamped it out and colored it up with my Copics.  For the water, I first used my BG10 marker and colored the whole thing in one solid layer  Then I used some distress ink around the top and sides of the panel to create depth.  On one of the cards, I used a sun rays stencil to add some interest.  I also used another stamp on that card to create the large rock in the middle of the card.  The original image was Kraftin' Kimmie Serena Sparkles.  I just wiped off the mermaid, leaving the rock and stamped that onto my image.  Then I added part of the Ocean Background Stamp above it.  To complete the backgrounds, I added some solid fish stamps from my stash as well as some sentiments.  The only think left was to color up my mermaids, fussy cut them out, and pop them on top using some foam tape.  They each got one little ocean friend as well.  Like, I said, I am so happy with how these turned out and will probably try this technique again with different stamps. 


Card Details:
Retired Kraftin' Kimmie Ocean Background Stamp
Retired Kraftin' Kimmie Serena Sparkles Stamp


Friday, June 19, 2020

Purple Onion Designs Lazy River

Hello!  Well, we are full swing into summer!  Today, I have a fun little Lazy River card for you featuring some of the new stamps from Purple Onion Designs.  Almost all of these images are from the New Sunshine Lake Collection, but a few of them are "oldies, but goodies."  I just love that you can mix and match all of the Stacey Yacula stamps to create the perfect scene!  For my card, I used the Lazy River Background Stamp and colored it up with Copics.  Then I stamped a few clouds from the Fairgrounds Background Stamp and added my sentiment.  Next, I stamped out my images, colored them with Copics, and fussy cut them out.  I used foam tape to adhere them to my scene.  Most of the images are from the Sunshine Lake Collection, but the umbrella, beach ball, sand pail, and shovel are all from the Happy Trails Collection.

I just love how this turned out.  Such a great way to wish someone a happy summer!


Card Details

Wednesday, June 17, 2020

MFT Tweet Friends

Hello there!  Hope you are having a great week!  Today, I have a fun little card to share featuring the Stacey Yacula set from MFT called Tweet Friends.  This little set is one of my all time favorites.  These little birds are just the cutest!  To create this card, I started with the Pathway Background stamp from Hello Bluebird.  I'm telling you guys.  This stamp is awesome!!! It goes with just about everything.  I colored up the scene with my Copics.  Then I stamped out my little birds, colored those up and cut them out using the coordinating dies.  Then I used foam tape to add them to my scene.  I also stamped out my sentiment and some musical notes.  And that's it!  Easy peasy!  

Thanks so much for stopping by!  Have a great day!


Card Details:


Tuesday, June 16, 2020

La-La Land Crafts June 2020 Club Kit Reveal

Hello there!  Hope you're having a great week so far.  Today, I'm so excited to share the new La-La Land Crafts June 2020 Club Kit!  This kit is packed full of adorable summer-themed stamps and dies!  You are going to LOVE it!  You can find all the subscription details HERE on the website.  Just a reminder that you have until June 30th to subscribe if you want this exact kit.  So be sure to check it out soon!  

For my first card, I used the pigs and created a little beach scene with my Copics.  I trimmed the legs off the pool-floatie pig so that you could be swimming in the water and popped him up with some foam tape.  Then I die cut the whole scene with the largest scalloped rectangle die and popped that on top of some patterned paper.  I also die cut the sand castle from some tan card stock and tucked that in on each side of my image.  The beach ball and sand pale finish it off.  Such a fun, summery card!  


Card Details:
Scalloped Rectangles Die: https://www.lalalandcrafts.com/Scalloped-Rectangles-Die_p_884.html
Golden Sunset Paper Pack: https://www.lalalandcrafts.com/Golden-Sunset-Paper-Pack-_p_1105.html

Copic Colors:
Pigs: R000, R11, R20, E97
Sand: E30, E31, E33, E35
Water: B21, B24, B26, B29
Red: R24, R27, R56, R59
Yellow: Y23, Y26
Green: YG21, YG25

For my next card, I used Marci and colored her up in a little yellow polka-dot bikini.  I couldn't resist.  To create my card, I started with some patterned paper and trimmed that to fit my card base.  Then I die cut a circle from the cloud paper and added a strip of tan card stock to the bottom to simulate sand.  I added Marci with some foam tape and tucked my sentiment just under her.  I also added my die cut castle in the background and the sand pail.  


Card Details:
Stitched Nested Circles Die: https://www.lalalandcrafts.com/Stitched-Nested-Circles-Die_p_793.html
Pierced Scalloped Circles Die: https://www.lalalandcrafts.com/Pierced-Scalloped-Circles-Die_p_789.html
Spring Has Sprung Paper Pack: https://www.lalalandcrafts.com/Spring-has-Sprung-Paper-Pack_p_1209.html

Copic Colors:
Skin: E30, E31, E00, E35, R20, R22
Hair: C5, C7, C9
Yello: Y23, Y26
Orange: YR04, YR16, YR28
Blue: B21, B24, B26
White: C1, C3

Monday, June 15, 2020

La-La Land Crafts: Use New Release

Hello!  Today, I have a SWEET card to share with you guys (pun intended).  To create it, I started with 3 of the new hamster stamps from La-La Land Crafts and colored them up with my Copics.  Then I fussy cut them out and set them to the side while I worked on the rest of my card.  I used the largest Scalloped Rectangle die to cut a brown piece of card stock and then I layered on some blue polka dot patterned paper, trimmed to fit inside the scalloped rectangle.  After adhering the two pieces together, I die cut the Hello Sentiment from tan and white card stock and layered them together.  I adhered that to the bottom of my card panel and popped the die cut mixer on top.  Then I added my hamsters using foam tape and finished it off with the "cupcake" sentiment from the stamp set.  Such a fun little card!


Card Details:

Copics:
Hamsters: E30, E31, E33, E35, R20
White: C1, C3
Yellow: Y23, Y26
Blue: B21, B24, B26
Brown: E57, E49

CC Designs Ella Swissie

Hello!  Today, I have a sweet little fairytale card for you featuring the NEW Ella Swissie stamp from CC Designs.  For my card, I used the Quad Collage die to create my background.  I also used the grass from the Cloud and Grass Die set to create my grassy hills.  Once I had my background created using patterned paper, I moved on to my little castle tower and added a little pumpkin in front of it.  Then I popped my image in front with some foam tape and added my sentiment to the top.  Such a sweet little fairytale card!


Card Details:


Saturday, June 13, 2020

Hi Sunshine

Hello, I have a fun little summer card for your today.  I used products from several different companies to create this one.  First I started with the MFT Distressed Patterns Stamp set and stamped out some ink splatters on the corners of my card.  Then I stamped my Sunshine sentiments from the Ellen Hutson All Inside Stamp Set.  I cut up some nautical themed patterned papers and layered them on top of each other.  Then I added a die cut port hole and the word "hey" die cut from red card stock.  I colored up my image from MFT and added her to the left corner using foam tape.  Then I added a few enamel dots, some die cut clouds, and there you have it, one bright, summery card!  


Card Details:
MFT Let's Get Nautical Die Set
Ellen Hutson All Inside Clear Stamp


Friday, June 12, 2020

Purple Onion Designs Sunshine Lake

Hello there!  I am so excited.  I just got my order from Purple Onion Designs with all the brand new stamps from the Sunshine Lake Release from Stacey Yacula.  As soon as I received, them I knew I had to create something right away.  So, this is what I came up with.

I love that there are several different background stamps in this collection which makes card design a breeze!  First, I stamped out the Lake Background towards the top of my card panel.  Then I stamped the Grassy Shore across the center and the Rocky Shore across the bottom.  See... super easy.  I didn't even have to mask anything off!  Then I just colored it up with my Copics and added my little animals that I had stamped separately and fussy cut.  To finish it off, I added a little Stickles glitter to the clouds, added my sentiment, and included some white highlights with my gel pen.  Such a fun, summery card!


Card Details:

Thursday, June 11, 2020

Moonlight Whispers: Outer Space Love

Hello!  Hope you are having a great week!  I have a fun Moonlight Whispers card to share with you today!  This image is called Outer Space Love and is a digital stamp on Etsy.  As soon as I saw it, I knew I had to have it!  So, to create my card, I started with a piece of white card stock and die cut it using a rectangle die from MFT.  Then I trimmed a piece of galaxy patterned paper from Papertrey Ink and adhered that to the right side of my card panel.  I stamped my sentiment and added a die cut moon from CC Designs to the bottom.  Then, I colored up my image, and cut it out using my Scan N Cut 2. Using foam tape, I adhered it to the patterned paper and added a few star-shaped embellishments.  I just LOVE how this turned out!  So fun and whimsical!


Card Details: 
Outer Space Love Digital Stamp: https://www.etsy.com/listing/786655706/outer-space-love-digital-stamp-instant?ref=shop_home_feat_3
CC Designs Outer Space Die: https://ccdesignsrs.com/products/new-outer-space-metal-die?_pos=1&_sid=45b7bbb15&_ss=r
Out of this World Patterned Paper: https://www.papertreyink.com/paper/out-of-this-world-patterned-paper-collection-28-sheets/
MFT Diagonal Stitched Inside Out Rectangle Dies: 


Tuesday, June 9, 2020

La-La Land Crafts June 2020 Release: Coffee is Life


Hello,
I'm back to today sharing another fun card using the new release from La-La Land Crafts.  Today, I'm featuring Coffee is Life Clear Stamp Set!  

For my card, I started with two strips of patterned paper.  Then I used some of the new dies to spell out the work coffee across the bottom strip.  Instead of using the coffee bean for the "O", I added my colored image.  Then I added several die cut embellishments to the top strip and finished it off with some brown scallops.  


Card Details:

Copic Colors:
Hamster: E30, E31, E35 R20, R11
White: W0, W1, W3
Teal: BG10, BG11, BG13


Monday, June 8, 2020

La-La Land Crafts June 2020 Release: Laundry Cats


Hello!  It's time for the La-La Land Crafts June 2020 Release!  All the new products are in the store.  So stop by and check out all the new goodies.  Today, I'm featuring Laundry Cats.  This is a super fun rubber stamp set that features 3 adorable cats and coordinating sentiments.  

For my card, I decided to create a little laundry room scene.  I started with some patterned paper and added a piece of tan cardstock across the bottom to simulate the floor.  Then I added a white baseboard and trimmed to fit my card base.  I used the new laundry dies to die cut and paper piece a washing machine and two laundry baskets.  Then I colored up my cats, fussy cut them out and added them to my scene using foam tape.  To finish the card, I stamped out my sentiment and added a die cut clothespin to the edge.  So fun!  


Card Details:

Copic Colors:
Yellow: Y21, Y26
Pink: R20, R22
Grey: C0, C1, C3
Green: YG21, YG25, YG67


Saturday, June 6, 2020

Hello Bluebird: Just For You

Hello!  I hope you are having a wonderful day!  Today, I'm so excited to share a fun little fairy card using two amazing stamp sets from Hello Bluebird.  First, I used the new Pathway Background stamp to stamp my background.  Then, I colored it up using Copics.  Next, I stamped out all my fairy images and accessories and die cut them out using the coordinating dies.  Then, I just adhered them to the card using glue or foam tape.  That's it!  This is one of the easiest cards I have ever made! And, I just love how it turned out!  So fun!  


Card Details:


Friday, June 5, 2020

Purple Onion Designs Sunny Meadow Fair 3D Card


Hello there!  I have a very fun project to share with you guys today!  One of my favorite designers is Stacey Yacula.  Here illustrations are always adorable and one of my absolute favorite collections is Sunny Meadow Fair.  As soon as I started coloring these little cuties up, I knew I wanted to create a 3D card.  For the base of the card, I used Marianne Designs Box Card Die.  Then I stamped the sides and background using the Fairgrounds Background Stamp.  I colored everything in with Copics and then started assembling my card.  I tried to add as many characters as possible to my scene while trying to keep each one visible.  After I was finished cutting, fussy cutting, and gluing, I added some Stickles glitter glue to my clouds and some white highlights with a gel pen. 


I just love how this turned out and I had so much fun creating it!  I love this collection even more after working with it and I can't wait to use it again!  

Card Details:


Thursday, June 4, 2020

CC Designs June 2020 Release!

It's Here!  Release Day!  The New CC Designs June Release is available now!  Be sure to hop over to the shop and check out all the new goodies!  

Today, I'm featuring NEW Snow Swissie!  Adorable!  For my card, I used some dies in my stash to create a woodland background.  Then I colored up my image with Copics and cut her out using my Scan N Cut 2.  Then I popped her on top with some foam tape and added my sentiment.  Easy Peasy!  


Card Details:
New Snow Swissie Clear Stamp Set: https://ccdesignsrs.com/products/new-snow-swissie-clear-stamp-set?_pos=3&_sid=3561de018&_ss=r
Banners Accessories Die: https://ccdesignsrs.com/products/new-banners-accessories-metal-die?_pos=3&_sid=e1c0ddcd7&_ss=r


Wednesday, June 3, 2020

CC Designs June 2020 Release Preview Day!

Hello!  Guess what day it is!  CC Designs June 2020 Release Preview Day!  Today, I'm featuring To The Market Swissie.  Isn't she adorable!!!  

For my card, I started with a piece of white card stock and stenciled in some clouds.  Then I used some die in my stash to create two paper pieced buildings for the background.  I added a thick grey strip of card stock to the bottom of the panel and added a white banner across the center of it.  Then I colored up my image with Copics and cut her out using my Scan N Cut 2.  Then I popped her on top with foam tape, just beside my sentiment.  I also die cut "hello" from navy blue card stock and added that to the top left side of my card.  


All the new stamps will be available in the Shop tomorrow!  Be sure to hop over there and check them out!  

Card Details:

Tuesday, June 2, 2020

Club La-La Land Crafts May Club Kit 2020

Hello, hello!  I'm so excited to share even more projects with you using the NEW May 2020 Club La-La Land Crafts Kit!  Remember, you have until June 10th to subscribe if you want this exact kit.  You can find all the details HERE on the site. 

For my first project, I created a set of 3 chipboard tags!  To begin, I die cut each tag from my chosen patterned paper.  Then I die cut the same sizes out of chipboard and white card stock.  I adhered the white card stock to the back of each chipboard piece and adhered the patterned paper to front of each.  Then I decorated the front of each with stamps and die cuts.  I just love how these turned out.  Such a fun accent to tie onto a package or treat bag.  


Card Details:

Copic Colors:
Skin: E000, E00, E11, E04, R20
Hair: Y21, Y26, E57
Red: R24, R27, R56, R59
White: C0, C1, C3
Brown: E30, E31, E33, E35
Blue: BG10, BG11, BG13


For my next project, I created a no-line coloring card using the bunnies.  I stamped them out in light tan ink and colored them up using my Copic Markers.  Then I fussy cut them out and popped them onto my scene using foam tape.  To create my scene, I started with some white card stock and stenciled some clouds.  Then I die cut 3 layers using the stitched hillside borders die and colored them using Copic markers.  I adhered them to the bottom of my card panel layering them one on top of the other  Then I die cut my barn from white card stock as well and colored it will Copic markers too.  After assembled, I mounted the whole thing on some blue card stock cut using the largest scalloped rectangle die.  


Card Details:

Copic Colors:
Bunnies: E50, E53, E55
Pink: R00, R11, R20
Tan/Sand: E30, E31, E33, E35, E37
Orange: YR04, YR16, YR27
Green: YG21, YG25, YG67
Red/Barn: R24, R27, R29, R56, R59


Monday, June 1, 2020

La-La Land Crafts: Anything Goes

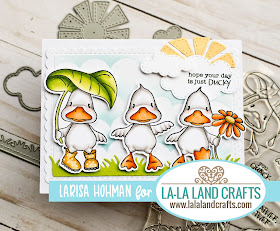
Hello!  This week's them at La-La Land Crafts is Anything Goes.  So, for my card, I used these adorable ducks and created a little spring scene with them.  First, I started with a scalloped rectangle and die cut that out of white card stock.  Then I layered on another piece of white card stock, trimmed to fit inside.  I stenciled some clouds and adhered some green die cut grass to the bottom.  Then I colored up my ducks and popped them on top using some foam tape.  I also included a couple of die cut clouds and a little sun.  I just love how this turned out.  A great way to brighten someone's day!


Card Details:


Copic Colors:
Ducks: W0, W1, W3, R11
Orange: YR04, YR16, YR27
Yellow: Y21, Y26
Green: YG21, YG25, YG67