Wednesday, June 26, 2019

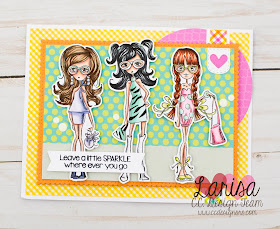
CC Designs Leave a Little Sparkle...

Hello!  Today, I'm popping on to share a fun and cheerful card using the NEW girl stamps from CC Designs.  For my card, today I'm featuring Isabella, Bree, and Coco.  These stamps are 50% off in the Shop, but they are going fast to stop over there and pick them up before they are gone!  

To create my card, I layered some bright patterned papers in the background.  Then I stamped out my images, colored them up with Copics, and cut them out using my Scan N Cut 2.  Then I trimmed a large rectangle to fit just inside the orange scalloped card stock and popped my images on top using foam tape.  Then I added my sentiment to the bottom and cute little tag to the top right corner.  Such a fun card!  


here's a look at the inside: 


Thanks so much for stopping by!  Have a great day!  

Card Details:

Monday, June 24, 2019

La-La Land Crafts - Flowers!

Hello, hello!  Hope you are having a great Monday!  Today, I'm sharing a sweet little card from La-La Land stamps featuring FLOWERS!  Such a perfect theme for summer!  For my card, I chose the NEW Love to Garden Clear Stamp Set!  To create my background, I used orange ink and stamped the sunflowers on top of yellow gingham paper.  Then I trimmed it into a rectangle and mounted it on a piece of white card stock cut with the largest scalloped rectangles die.  Then I started working on my oval panel.  I die cut a light blue piece of card stock into an oval and added a grassy border across the bottom.  Then I added the fence die cut out of white and a few of the little vines.  I colored up my images with Copic markers and cut those out with my Scan N Cut 2.  Then I popped them on top of my scene using some foam tape.  I added a bunch of die cut flowers around them and stamped my sentiment on the banner die.  Finally I adhered it all together and added some enamel dots the center of the flowers.  


here's a look at the inside of the card:


Card Details:
Oopsie Daisy Background Stamp Set: https://www.lalalandcrafts.com/Oopsie-Daisy_p_844.html

Copic Colors:
Skin: E000, E00, E11, E04, R20
Black: C5, C7, C10
Blue: B24, B29, C9
Yellow: Y21, Y26, E87
Brown: E43, E47, E49
Orange: YR15, YR28, E09
Green: YG21, YG25, YG67
Red: R24, R27, R56, R59
Teal: BG10, BG11, BG13

Tuesday, June 18, 2019

Club La-La Land Crafts June 2019 Club Kit


Hello!  Today, I'm back sharing two more fun cards using the NEW Club La-La Land Kit!  Remember, you must subscribe before June 19th if you want this exact kit.  You can find all the info HERE!  

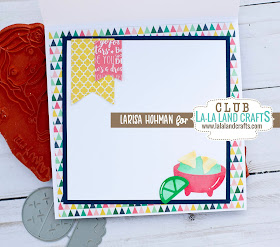
For my first card, I kept things pretty simple so that the stamps and dies would really take center stage.  First I trimmed a piece of white card stock into a rectangle and mounted it on top of the largest scalloped rectangle die cut with red card stock.  Then I trimmed a strip of wood grain patterned paper and adhered that to the bottom of my panel to mimic a table top.  I colored up my chihuahuas and cut them out with my Scan N Cut 2.  Then I die cut my queso, guacamole, and taco.  I used distress inks to give them some interest, layered them together and arranged the elements on my card.  Then I added my FIESTA word die and layered it on top of die cut fun foam.  To finish the card, I added lots of little triangles from the center of the lime die and added some white accents with my gel pen.  


Here's a look at the inside: 


Card Details:
Chihuahua Stamps
Taco Die
Guacamole Die
Fiesta Word Die

Copic Colors:
Chihuahuas: E30, E31, E34, E35, R20

My next card features Fiesta Marci.  For this card I started with a simple striped patterned paper and trimmed it into a square to fit my card base.  Then I layered some navy blue card stock behind it.  I used my circle die to cut some patterned paper and layered that on top of a green scalloped circle.  Then I adhered that to the left side of my panel and trimmed of the excess with my scissors.  I colored up Marci and cut her out with my Scan N Cut 2.  Then I adhered her to the center of the circle.  I die cut my fiesta word from navy blue card stock, layered it on top of some fun foam and adhered that across the bottom of my card.  Then I stamped out my sentiment, trimmed it into a rectangle, layered it on top of some mint card stock and popped it underneath the fiesta word.  To finish my card off, I added a page flag to the top right corner of the card, popped my taco die on top, and added a few enamel dots. 


here's a look at the inside: 


Card Details:
Fiesta Marci
Chihuahua Stamp Set
Taco Die
Guacamole Die
Fiesta Word Die


Copic Colors:
Skin: E000, E00, E11, E04, R20
Hair: E43, E47, E49
Red: R20, R24, R27
Yellow: Y21, Y26
Teal: BG10, BG11, BG23, BG57
Green: G40, G43

Monday, June 17, 2019

La-La Land Crafts New Release!

Hello!  Today, I'm back sharing another fun card using the NEW Release from La-La Land Crafts!  There are so many adorable NEW stamps, dies, and stencils in this release, it's hard for me to choose a favorite!  

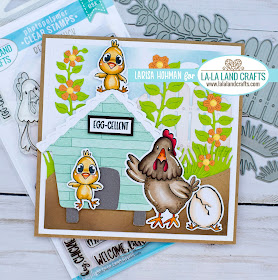
For my card today I decided to create a little hen house for my chicks!  First I used the clouds die to stencil in my background.  Then I added my dirt using the double stitched hills die.  I pieced together my hen house using the door die to cut my opening and layering some dark brown paper in behind it.  Then I used the bottom of the garden gate die to create two legs for it.  I colored up my images, cut them out with my Scan N Cut 2 and popped them on to my scene using foam tape.  I also used some of the new dies in my background including the vines and gate die.  I just love how this turned out.  Too cute!  


her's a look at the inside: 


Card Details:

Copic Colors:
Chicks: Y21, Y26, Y35
Hen: E40, E43, E44, E47
Red: R27, R56, R59
White: E50, E53
Orange: YR15, YR28

Saturday, June 15, 2019

Club La-La Land Crafts June Kit Reveal!


Hello!  It's reveal day at Club La-La Land Crafts!  This month's kit is all about FIESTA!  It includes a super sweet Marci stamp, three chihuahuas, lots of sentiments, a fiesta word die, bowl of guacamole die, and a taco die!  How fun is that!  Remember, you have until June 19th to sign up for this exact kit so be sure to subscribe HERE!  

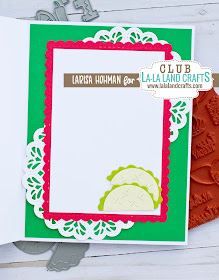
For my first inspiration card, I masked Marci with two of the chihuahuas.  I colored them up with my Copics and cut them out using my Scan N Cut 2.  Then I started working on the background of my card.  First I trimmed a piece of green card stock to fit my card base.  Then I used the All About Lace Layering Stencils to create a tone on tone background.  I did the same thing with the red, but layered that on white card stock.  Then I added a cobblestone floor using a background stamp.  To give it a little contrast I added the Mandala Doily cut in white card stock in between the layers.  Then I popped my images on top with foam tape, added my "fiesta" word die, and a couple of die cut tacos.  I stamped my sentiment on a piece of white card stock and die cut it into a circle.  To finish it all off, I added some enamel dots and a ton of little triangles from the lime die.  


here's a look at the inside:


Card Details:
Fiesta Marci
Taco Die
Guacamole Die
Fiesta Word Die

Copic Colors:
Skin: E000, E00, E11, E04, R20
Hair: C5, C7, C10
Red: R24, R27, R56, R59
White: C0, C1, C3
Green: YG21, YG23, YG67
Chihuahuas: E30, E31, E34, E35

For my second card, I decided to create a business size card.  I trimmed some polka dot patterned paper to fit and layered that on top of black card stock.  Then I arranged my dogs and food in a line across the middle of the card, using foam tape to pop up the chihuahuas.  Then I slipped to strips of patterned paper underneath them and layered my fiesta sentiment on top of that.  To finish it off, I added some enamel dots.  


here's a look at the inside:


Card Details:
Fiesta Marci
Taco Die
Guacamole Die

Copic Colors:
Chihuahuas: E30, E31, E34, E35, R20


Friday, June 14, 2019

CC Designs Eloise

Hello!  Today, I'm sharing a fun card using some of the new stamps and dies from CC Designs!  The best part is...they're currently 50% off!  You can see them all here!   For my card, I used the new Paris Background Rubber Stamp to create my background panel.  I stamped it on black card stock and white heat embossed it.  Then I added some coordinating patterned papers, and popped my image on top with foam tape.  I stamped my sentiment using the new Fabulous Sentiments Clear Stamp Set and tucked that in behind her.  Then I added some die cut flowers and a couple of page flags.  


Thanks so much for stopping by!  Hope you have a great day!
Card Details:
Eloise Rubber Stamp
Paris Background Rubber Stamp Set
Fabulous Sentiments Clear Stamp Set
Foliage Dies


Wednesday, June 12, 2019

La-La Land Crafts In The Garden Marci


Hello!  Today, I have the cutest little Marci Card to share with you!  This is In The Garden Marci and she is part of the new June Release at La-La Land Crafts!  

For my card, I chose some fun and bright summer colors.  First, I colored up my image and cut it out using my scan N Cut 2.  Then I trimmed a piece of white card stock to fit my card base and stenciled a red plaid background.  Then I used the cloud die to stencil in a cloud background on another piece of white card stock.  I added a die cut fence, some grass, vines,  and flowers to my scene.  Then I popped Marci on top with some foam tape.  I stamped my sentiment in the top right corner and layered the whole piece on top of a blue die cut doily.  For a little extra interest, I added a yellow scallop die to the left side of my card.  


A look a the inside:


Copic Colors:
Skin: E000, E00, E11, E04, R20
Hair: Y21, Y26
Red: R24, R27, R56, R59
Orange: YR15, YR28
White: C0, C1, C3
Blue: B24, B26, B29, C9


Tuesday, June 11, 2019

La-La Land Crafts Best of Cluck!


Hello!  I'm back again today featuring another fun stamp set from the NEW June Release at La-La Land Crafts!  Today, it's all about chickens!!  The NEW Best of Cluck Stamp set is all kinds of fun with two mother hen stamps, 4 baby chicks, and lots of matching sentiments!  

For my card, I created a little farm scene!  First I used the NEW Daisies on My Mind Layering Stencil to create by background.  Then I layered on a little barn using the Country Hill Die.  In the foreground, I created a fun little scene complete with picket fence, vines, grass, flowers and of course...chickens!  After layering together the whole panel, I stamped a daisy background and adhered it on top.  I just love how fun this is!  


A look at the inside: 


Oopsie Daisy Background Stamp Set: https://www.lalalandcrafts.com/Oopsie-Daisy_p_844.html


Copic Colors:
Chicks: Y21, Y26, Y35
Hen: E40, E43, E44, E47
Red: R27, R56, R59
White: E50, E53
Orange: YR15, YR28


CC Designs Tutorial- How to Create a Total Background Using the Clouds and Grasses Stencil

Hello!  Today, I'm so excited to share a fun tutorial using the NEW Clouds and Grasses Stencil from CC Designs!  This stencil is an absolute MUST!  You can create so much with it! 


Step #1: Gather your supplies.  You will need the Clouds and Grasses Stencil, colored ink (light blue, green, and darker blue), a blending tool (brushes or sponges), smooth white card stock. 


Step #2: Use the lightest blue ink and cloud side of stencil to create clouds on top portion of the card stock.  To get a more natural look, blend ink in selected spots instead of all the way across the stencil.  Vary the position of the stencil and chosen areas for blending. 


Step #3: Clean ink off of stencil with a baby wipe and dry.  Then use green ink and grass side of stencil to create a grassy hill in the middle of the card stock.  Use the straight grassy side just below it to add some depth to your scene. 


Step #4: Clean green ink from stencil.  Use darker blue ink and the cloud side of stencil to create waves at the bottom of the card stock.  Flip the stencil upside (I'm creating a grassy scene here, but this is also a great way to create a beach scene). 


Step #5: Clean stencil.  Allow card stock to dry for about 30 min.  Then use colored images to create a fun card.  Here, I've used images from the April & May Stamp Set to create my spring scene. 


Thanks so much for stopping by!  Have a great day! 


Monday, June 10, 2019

La-La Land Crafts This Little Piggy!


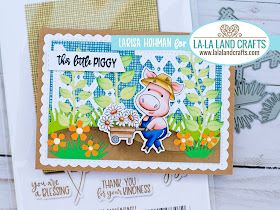
Hello!  It's time for the June La-La Land Release!  So many awesome stamps, dies, and stencils released this month!  Today, I'm featuring This Little Piggy!  This seat includes 4 adorable pigs and several coordinating sentiments!  For my card, I decided to create a little gardening scene.  First I die cut a scalloped rectangle from white card stock.  Then I used the new Simple Joys background stamp to stamp my background in blue.  I trimmed it to fit inside the rectangle and adhered the two together.  Then I die cut two lattices in white and layered those on top.  I added some "dirt" to the bottom of my scene with the stitched hills die and added some grass and vines.  Then I colored up my piggy, die cut him out using my Scan N Cut 2 and popped him on top with some foam tape.  A few flowers and my sentiment finish it all off.  


here's a look at the inside:


Card Details:

Copic Colors:
Pig: R000, R11, R20, E99
Black: W7, W3
Blue: B24, B29, C9
Yellow: Y21, Y26, E87
Brown: E30, E33, E35
Orange: YR15, YR28


Thursday, June 6, 2019

CC Designs Release Day!

It's Release Day at CC Designs!  So many fun stamps and dies being released today!  Be sure to head over to the shop and check them all out!  For my card today, I'm featuring Bree and the New Fashionista Dies!  To create my card, I cut a piece of patterned paper to fit my A2 size card.  Then I trimmed a piece of black card stock so that the sides were slightly shorter.  I die cut four circles and layered that on top of my patterned paper.  Then I used the NEW Fashionista die set to create the fun fashion accessories and placed each one in the center of my circles.  I stamped out my image, colored her up using Copics, and cut her out with my Scan N Cut 2.  Then I popped her on top with some foam tape.  For my sentiment, I used the NEW Paris Dies set.  


Thank you so much for stopping by!  Have a great day!

Card Details:
Bree Rubber Stamp
Fashionista Die Set
Paris Die Set


Wednesday, June 5, 2019

CC Designs June Release Preview Day 2

Hello!  It's Day #2 of Previews for the NEW CC Designs June Release!  This release includes everything "girly" from Stamps to Dies!   For my card today, I'm featuring Isabella!  Out of all the new stamps being released, I think she might be my favorite!  To create my card, I started with some pretty patterned paper and die cut that into a scalloped rectangle for the background.  Then I layered on a couple of journal cards.  I colored up my image with Copics, cut it out with my Scan N Cut 2, and popped it on top with some foam tape.  I also clustered a cute little Eiffel Tower die cut, some pretty flowers, and my sentiment.  To finish it off, I added a couple of flags and some die cut hearts.  


Here's a look at the inside:


Card Details:
Isabella Rubber Stamp
Paris Dies
Foliage Dies
Fabulous Sentiments Clear Stamp Set

Monday, June 3, 2019

La-La Land Crafts: Masculine Card

Hello!  Today, I'm sharing a fun Masculine Card for this week's theme at La-La Land Crafts!  This adorable stamp is called Jaunty Luka!  Isn't he adorable!  To create my card, I layered up some masculine patterned papers, colored my image to match, and cut it out on my Scan N Cut 2.  Then I die cut and pieced together my coffee cup and tucked that in behind Luka.  I stamped my sentiment on a strip of white card stock and added that across the cup.  Then I layered on two little coffee beans!  I just love how this turned out!  


here's a look at the inside:


Card Details:
Double Stitched Ovals Die: https://www.lalalandcrafts.com/Double-Stitched-Ovals-Die-_p_1057.html

Copic Colors:
Skin: E000, E00, E11, E04, R20
Hair: E43, E47, E49
Orange: YR12, YR16, YR27, E08
Blue: B29, C10
Grey: C5, C7, C9
Brown: E44, E47